- 0. Carving Menu
- 1. Materials
- 2. Finding Images
- 3. Transfer Image
- 4. Carving the Stamp
- 5. Mounting
- 6. Samples
Stamp Carving 101
Mounting the Stamp
At this point, you can choose to mount your stamp. You don't have to—the vast majority of letterboxing stamps don't have them! But mounted stamps appear more professional and may be easier to stamp without getting ink all over your fingers. Mounting your stamp is a completely optional step, but in some cases, it shouldn't be done at all. For example:
- Microboxes may not be large enough to hold a mounted stamp
- Mastercarve carving blocks are often very thick all by itself—so thick, in fact, you can easily carve both sides of it without any problems! Essentially, the carving block is a built-in mount.
- Large, mounted stamps are nearly impossible to press down evenly, causing the edges of the stamp to be well formed while the center of the stamp may not show up at all. If you find a stamp like this, you may actually get better results by pressing the paper to the stamp instead of the stamp to the paper!
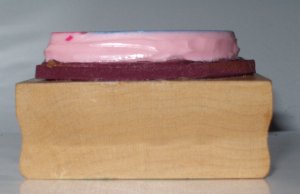
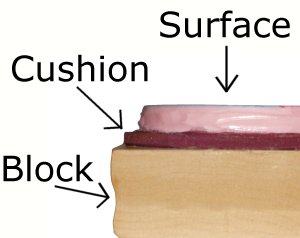
Let's examine the anatomy of your typical store-bought stamp. Most letterboxers will glue their stamp directly to a piece of a wood or other block, but if you look closely at a store-bought stamp, you'll notice a thin piece of foam-like material between the stamp and the block.
This layer is called the cushion, and the cushion helps distribute the pressure on the mount evenly across the stamp's surface making a cleaner, clearer impression.
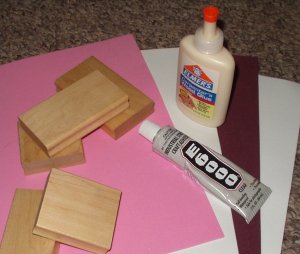
Now it's time to gather the materials you'll need to mount your stamp:
- Block of wood, slightly larger than the stamp to be mounted
- Thin layer of foam (optional)
- Adhesive, capable of withstanding water, cold, and other adverse conditions. Make sure it works on the stamp, foam, and mount! I've had success with E6000 and outdoor wood glue, but many other glues will also work.
- Sandpaper, stain, lacquer, and/or varnish (optional)
If you are mounting your stamp to a wooden block, give special consideration to applying a protective finish to help keep out moisture that may cause your stamp to warp. The foam helps to create even stampings if the mount warps, but it is best to prevent warping in the first place!
- (Optional) Cut the mount to a size slightly larger than the stamp to be mounted and smooth the surface with sandpaper. For an additional professional touch, you might consider staining the wood, but use a light color so it won't drown out the stamped image that will go on the mount.
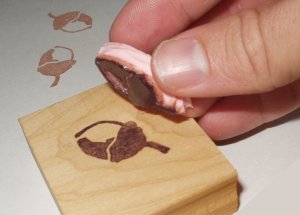
- Stamp the back of the mount with a dark color.
- (Optional) Apply lacquer or varnish to your mount. Follow directions on the labels and let dry. Do this in a well-ventilated area for your safety!
- Cut foam slightly larger than stamp, and glue stamp to the foam. Scoring the back of your stamp with an X-acto knife before gluing increases the surface area for the glue to stick to resulting in a better bond. Clamp together lightly for a strong bond. Allow adhesive to dry.
- Glue foam (with the attached stamp) to the mount. Roughing up a wooden mount with sandpaper before gluing increases the surface area for the glue to stick to resulting in a better bond. Clamp together for a strong bond. Allow adhesive to dry.
- Try out your stamp!