Help: Planting
- How do I hide a letterbox?
- Do I need permission to hide a box?
- Is it okay to use a store-bought stamp?
- Should I put the letterbox in a plastic bag?
- How do I list a mystery letterbox?
- How do you create stealthy containers?
- What container should I use for planting?
- How do you put a letterbox together?
- Is it okay to plant a letterbox in a cemetery?
- Should I include an ink pad or markers in my letterbox?
- How do I make a planter’s pouch?
- What kind of prizes should I leave for first finders?
- What is a seedling?
- How do you adopt a letterbox once you have the owner's permission?
- Our class is going to plant a letterbox next week. Should everyone register their names oline?
- How can I tell if there are any geocaches near the spot I want to hide my letterbox?
- How do I list a letterbox with multiple planters or authors?
- How do I prevent my letterbox from going missing?
- How can I help prevent my stamp from being traded out for a trinket?
- How do I know if the place I am planting my letterbox is to public?
- Why can I no longer adopt abandoned boxes?
- What are GPS end points?
How do I hide a letterbox?
At a minimum, you'll want to include a small logbook and stamp in a weather-proof container. A pen or pencil is also useful. The logbook should be double-bagged in Ziplock bags since 'weather-proof' tends to be a relative term. The cheap supermarket varieties will work in a pinch, but for quality weather-proofing, you'll want the industrial brand freezer bags, and you'll want to double-bag it.
A small number of letterboxers include an ink pad, though it's not recommended since they can freeze in the winter, dry up in the summer, or leak and make a real mess of your letterbox. Letterboxers should always carry their own ink pads, so it's never necessary to leave one in boxes you've planted.
Others may include 'first finder' prizes that are for the first person who finds the box to take. Some letterboxers leave self-addressed stamped postcards so finders can mail updates about the letterbox.
Once the letterbox has been planted, write up some clues to lead people to the box and start distributing them. The variety of clues range from straight-forward to mind-numbingly complex that Albert Einstein would have trouble figuring out. Most clues in the United States are distributed through the Internet through websites such as LbNA or Atlas Quest.
And then wait for people to start finding them. Don't panic if nobody finds your letterbox immediately. It can take time for people to get out there and find your box, but letterboxers will come.
Do I need permission to hide a box?
Permission to hide a box is an excellent thing to acquire since you'll know the powers-that-be will help protect and maintain your letterbox. Without permission, they may learn of your letterbox anyhow and decide to confiscate it. Despite the advantages in asking for permission, most letterboxers feel it is easier to ask for forgiveness than for permission, and that's the standard in use today.
However, if a certain area is known to prohibit letterboxes such as national parks, it's considered bad practice to hide one there. Not only may you incur the wrath of the land managers, but your boxes are bound to have a short lifespan since the park personnel will remove your letterbox as soon as they learn about it. If you want your letterbox to live a long and happy life, avoid planting it in areas where letterboxing is prohibited.
However, if a certain area is known to prohibit letterboxes such as national parks, it's considered bad practice to hide one there. Not only may you incur the wrath of the land managers, but your boxes are bound to have a short lifespan since the park personnel will remove your letterbox as soon as they learn about it. If you want your letterbox to live a long and happy life, avoid planting it in areas where letterboxing is prohibited.
Is it okay to use a store-bought stamp?
Of course! A letterbox is more than just a stamp, and people will appreciate your box if it's hidden in a scenic area or takes them to an unusual location, so don't let the lack of a hand-carved stamp stop you from hiding a letterbox.
Most letterboxers do prefer finding hand-carved stamps, though. A common feeling among many letterboxers is that the only thing worse than a poorly-carved stamp is a store-bought stamp. In fact, most letterboxers enjoy finding a hand carved stamp even if the carver displays no talent at all, so long as he puts forth the effort. The only unforgivable sin in stamp carving is not caring; just stabbing an eraser a couple of times with the point on a pair of scissors and calling it a stamp is not acceptable.
If you intend to plant letterboxes, it's strongly urged that you give stamp carving a try. Stamp carving is a fun hobby in its own right, and it is probably easier than you think! Read our Stamp Carving 101 tutorial for more details.
A third option is a custom-made stamp, what the Brits call a "bespoke" stamp. You can go to the counter in an Office Depot or Staples office supply store and give them a design (either on paper or on computer media) and for a fee they will make it into a stamp for you. The process used results in the very best in unique rubber stamps, but it can be a bit expensive for planting letterboxes in the woods where they may eventually get lost or thrown away. Besides, many letterboxers prefer the unique nature of a hand-carved stamp over the automated perfection of a bespoke stamp.
Should I put the letterbox in a plastic bag?
A recent trend in some parts of the country is to put a one-gallon or other large plastic bag (e.g., Ziplocks) around the letterbox—please do not do this. Plastic bags are flimsy by nature—even the freezer bag versions—and will not hold up against sharp sticks, insects and rodents, and the general wear and tear that letterboxes are subjected to in the outdoors. A plastic bag around the letterbox will not last long and needs constant replacement. Even worse, once it has gotten holes, it can fill with water and mud putting the letterbox into an even more hazardous position than with no plastic bags at all.
Additionally, plastic bags do not have the camouflage properties a normal letterbox container usually has, and using them outside of the letterbox will put the box at an increased risk of accidental discovery.
The letterbox container should be the first defense to protect the contents of your letterbox from environmental elements. Containers have proven track records in this regard, but their most common failure is allowing moisture into the box. Plastic bags should be the second layer of defense against this moisture, but they are fragile and need protection from the other environmental elements that the container can provide.
A good general rule of thumb is when in doubt, try a different location. If you find that your box is soaked each time you check on it, then there is a good bet that your hiding location might be too low. No amount of good plastic containers or bags will change whether you are at or below sea level! Try opting for the higher, dry ground and your box will stay dry.
How do I list a mystery letterbox?
Any traditional letterbox that doesn't include a city is automatically listed as a mystery box. If it has a city listed, then it will not be a mystery box.
How do you create stealthy containers?
Camouflage:
There are different ways to make your container more stealthy and ultimately less likely to get found by accident or mistaken for trash.- Camo duct tape - one of the cheapest and fastest ways is to simply wrap your container well in camo duct tape.
- Paint - These paints are made specifically for plastic: Rustoleum Painters Touch or Krylon Fusion.
- Bags - Cloth bags made from camo-cloth (regular maintenance needed to replace worn out tattered bags); Plastic bags covered in camo duct tape.
- Silk leaves - buy silk leaves at a craft store and use a hot glue gun to attach them liberally to the sides and top of your container. Ivy leaves work well, and can usually be found in stores. Avoid getting glue on or in the box's opening seal, of course!
Pre-made boxes:
Dixie has pre-made containers for sale, using Krylon Fusion Camo Paints.Discussions and articles:
- Dixie's article on Stealthy Letterboxes
- There have been many discussions on the Atlas Quest boards about the tape.
- For some innovative containers (lots of photos) see this discussion on the geocaching forums: Pictures - Cool Cache Containers (CCC)
What container should I use for planting?
People use a variety of containers for planting letterboxes. Any container that is watertight and durable is a good choice.
Popular containers include:
Other container ideas:
If you plan to use a container that once contained food, you should take steps to get the food odor out – many animals have a keen sense of smell. Various methods for deodorizing your container are discussed in the Atlas Quest boards.
A very effective idea is to combine two containers into one. For example, you can take two small peanut butter jars and tape them together bottom-to-bottom, or tape the lids together top-to-top. Put the stamp in one end, the log in the other. The result is a long and slender container that fits neatly in many nooks and crannies. Taping two film canisters together bottom-to-bottom is also a popular idea for a very small letterbox. Some prescription pill containers come with a cap that goes on either of two ways, and this cap can be used to combine two containers into one long assembly without even using any tape.
Popular containers include:
- The general consensus is that Lock & Lock brand (see image) and Snapware (see image) are the premium containers for use outside because of their durability, waterproof seal and locking tabs. There are more and more knockoffs of the Lock & Lock style food storage container appearing all the time, such as Snapware's MODS (see image). Generic versions can be found at Dollar stores, but the quality may or may not be up to par.
- Rubbermaid Lock-Its (see Rubbermaid page) - similar to lock & locks - 4 flaps and a gasket
- Rubbermaid SealNSavers (see image) -- once preferred, but experience shows not as reliable as expected.
- Ziploc containers (see image) -- the twist/screw-top containers sometimes work well, but they are easily damaged by objects set or falling on them.
- Freezer bags covered with camo duct tape (see tutorial) (logbook still needs to be in a inner bag) Caveat: rodents tend to chew through them and insects like to inhabit the fold-over parts.
- Pill Bottles (see image) -- avoid the smallmouth screw top type, it's too hard getting a logbook in and out, but the push-and-twist cap type are good. Test the pill bottle by filling the kitchen sink with water and placing a heavy object on the pill bottle to hold it under water for a couple of hours. Put a dry piece of tissue or paper towel inside. If after 2 hours the tissue/paper is dry your container has passed the test.
- Old Thermos containers (see image) -- the short widemouth kind.
- Screw-top containers (see image) -- such as for facial cleansing pads, jewelry cleaner, Citrucel, peanut butter, mayonnaise etc.
- Film canisters - not the grey and black type (see image) they leak (try the kitchen sink test), use the clear film containers (see image)
Other container ideas:
- Commit containers (see image) Micro container. Size of a film canister. Smoking cessation lozenges. See lorax's post about their water tightness.
- Decon containers (see image) designed to hold military decontamination kits. Available at military-surplus stores, decon containers are small and watertight. It's a good idea to sand off the warnings molded into the plastic lid, and peel off (or cover up) the military warning label on the container. Caveat: experience has shown that some finders have a hard time getting the lid back on properly i.e. tightly.
Not recommended:
- PVC pipe (see image) Strongly NOT recommended. They can alarm non-letterboxers because they look like pipe bombs. See the Wandering Pirate post Don't touch anything that looks like this unless you have the clues for it and that you know that is in fact what you are looking for.
- Gladware containers (see image) -- they are easily damaged/warped by objects set or falling on them, by UV light, by the freeze-and-thaw process.
If you plan to use a container that once contained food, you should take steps to get the food odor out – many animals have a keen sense of smell. Various methods for deodorizing your container are discussed in the Atlas Quest boards.
A very effective idea is to combine two containers into one. For example, you can take two small peanut butter jars and tape them together bottom-to-bottom, or tape the lids together top-to-top. Put the stamp in one end, the log in the other. The result is a long and slender container that fits neatly in many nooks and crannies. Taping two film canisters together bottom-to-bottom is also a popular idea for a very small letterbox. Some prescription pill containers come with a cap that goes on either of two ways, and this cap can be used to combine two containers into one long assembly without even using any tape.
How do you put a letterbox together?
Here are 2 quick tutorials that will help you put a letterbox together:
Urban Letterboxing 'Beginner's guide' (flash tutorial)
A visual tutorial that includes: 1. Making a stamp 2. Making your box 3. Finding a box
Lone R's Make a letterbox
A visual presentation of the basic elements of a letterbox: container, stamp, logbook (and a couple of other items for good measure)
Is it okay to plant a letterbox in a cemetery?
Opinions vary. It is forbidden in some locations. When permission has not been sought in other locations, good judgement is appreciated. Letterboxes can be found around the perimeter of a cemetery, in hollowed-out trees, in bushes ... away from the headstones.
You may find letterboxes at headstones, when the placer is a relative or friend of the deceased. In keeping with the stealth aspect of letterboxing, finding cemetery letterboxes should be done with utmost respect. You may not be alone there.
You may find letterboxes at headstones, when the placer is a relative or friend of the deceased. In keeping with the stealth aspect of letterboxing, finding cemetery letterboxes should be done with utmost respect. You may not be alone there.
Should I include an ink pad or markers in my letterbox?
It is not a good idea to include ink pads in your letterbox. In dry climates, the ink pad can dry out quickly, making it useless. In damp climates, moisture can get into the box, causing the ink pad to leak and making an inky mess. In cold climates, the ink pad can freeze, again making it useless and possible causing it to leak when it thaws. Markers can also dry out or leak. And finally, some people prefer to use specific brands of ink with what they feel makes the most brilliant colors or are resistant to water, so even if there is nothing wrong with the ink pad, people will often not use it anyhow.
Instead of including the ink or marker, you can list the color or colors that you recommend for your stamp in your clues. That way, the finders can be sure to have the correct color.
Instead of including the ink or marker, you can list the color or colors that you recommend for your stamp in your clues. That way, the finders can be sure to have the correct color.
How do I make a planter’s pouch?
A planter’s pouch is a thin letterbox that can easily be tucked into cracks and crevices in urban locations that often are otherwise difficult to hide. To create one, follow mstrwndl’s helpful tutorial:
Safari Man has an additional method that does not require the use of a ZipLock bag, and those directions can be found in this photo album.
| # | Description | Sample Photograph |
| 1. | The first thing you are going to need is Duct Tape. Big Lots (this is not an endorsement) has duct tape for $2.49 a roll. I have seen rolls half the size at other stores for $6.00. Next you are going to need a 2 qt. Ziplock freezer bag. The double seal bags work the best. | 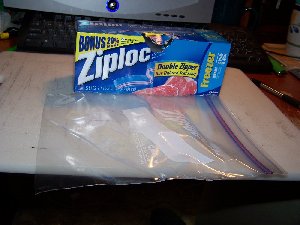 |
| 2. | If you have a cutting board and an X-acto knife, we are ready to start. Take a black Sharpie marker and make a mark 7 inches from the edge of the cutting board, and then another at 9 inches. | 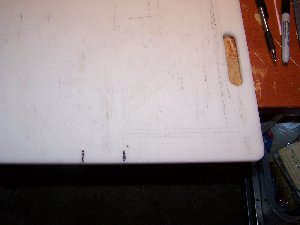 |
| 3. | Next measure two pieces of tape out onto the cutting board, one at 7” and one at 9”. The marks are so that you don’t have to grab a ruler every time you make a pouch. | 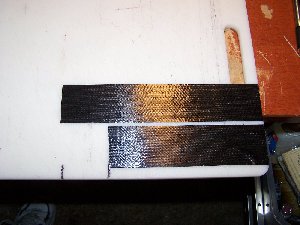 |
| 4. | With the X-acto knife, split the 7” piece lengthwise and leave it where it is. It won’t be in the way. You will come back to it and use both pieces, later. | 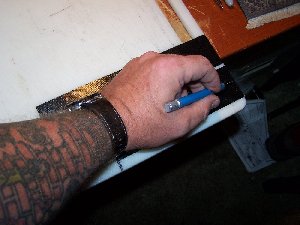 |
| 5. | With the 9” piece, measure 1” from the end and ½” up from the bottom. Make a slice straight down to the edge. I know this sounds confusing but check out the pictures. Do this on both ends and fold the center up in the back. | 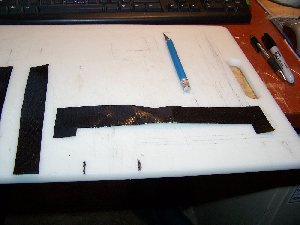 |
| 6. | Rotate the 9” piece over 180º and do the same thing on the other edge. The next picture will show you what you should end up with. This will end up being the strap. Set it aside and don’t let the sticky tabs on each end get messed up. | 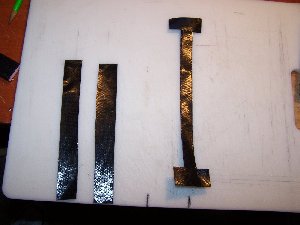 |
| 7. | Now look at a Ziplock bag. On one side there is writing. This side is about 1/8 inch shorter than the other side. We will call the side with the writing (the short side) the front. The other side (the long side) is naturally the back. You will notice this length at the place where the ink pen is pointing in the photo. | 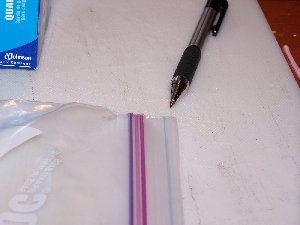 |
| 8. | Lay the baggie front side down and cover it with duct tape. You want the tape to hang off the bottom of the bag at least ½ inch. You want the tape to hang off the sides about 1 inch. It would be great if the tape hung off the top between 4 and 5 inches. This will be the flap. Overlap the pieces about ¾ of an inch with each strip of tape applied. It should take 6 or 7 pieces of tape to cover the bag. (see photo) The ink pen and knife are only to show the bag edges. This should give you an indication of how much overlap you will have. | 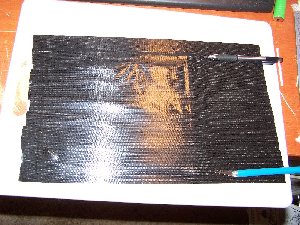 |
| 9. | Now, peel the whole thing up and flip it over. At the bottom corners of the baggie make a slice all the way straight down making sure not to cut the baggie, and fold the middle up as indicated in the next photo. | 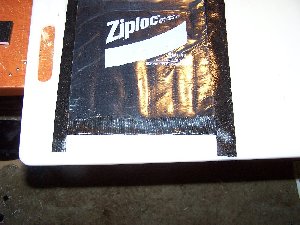 |
| 10. | You are looking at the front side of the baggie, now. Look at the point where the difference in length occurs and make a cut from the edge of the baggie to the edge of the tape on both sides. | 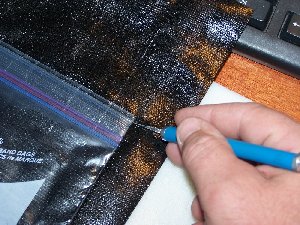 |
| 11. | When you get this done, fold the sides over and then fold those little end tabs to the back. Don’t cut them off as they serve to reinforce the corners. | 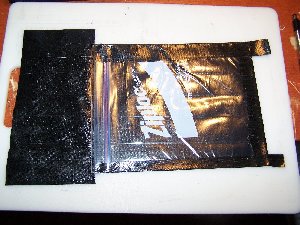 |
| 12. | Now that you are this far along you need to turn the bottom of the bag away from you and the sticky flap toward you. Take a piece of duct-tape and cover it crossways, making sure to cover the 1/8 inch difference in the back of the bag. (see photo, and disregard the little pile of PZ flakes on the left. They make great ice cream toppings.) |  |
| 13. | Now cover the front of the bag the same way you did the back of the bag making sure that you don’t overlap on the top. You want to go up to the edge of the bag and not off the bag at all. Look at where my left hand is in the next photo. You should get the idea. My finger is barely holding the tape down. | 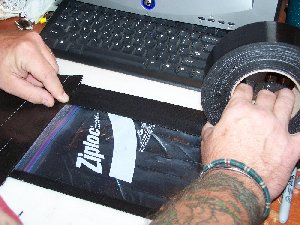 |
| 14. | Now that the front is covered make the same cuts at the bottom to fold and tuck that you made on the other side. If you don’t remember what you did, look back a step or two. The photos haven’t gone anywhere. While you are trimming the bottom, go ahead and fold the sides over as well. Now, somewhere, you should have two 7” strips that are narrow, where you cut the 7” strip earlier. You want to take one of them and place it half way on and halfway off (length wise) the tape edges on the front of the bag. | 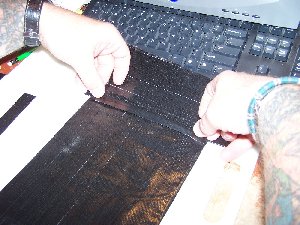 |
| 15. | Then go ahead and fold it over to hide the overlapped, exposed edge of the front of the bag. | 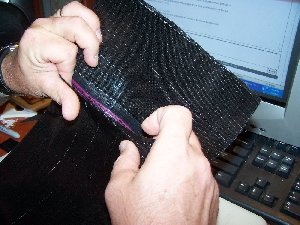 |
| 16. | There! No, wait... we’re not finished. Grab the 9” piece that you cut and folded while ago, to make the strap. Place your finger on the front of the bag and find where the seal is. You can feel it. Now that you have found it drop down about ½ inch and place the strap on evenly and fold the sticky tabs around to the back. | 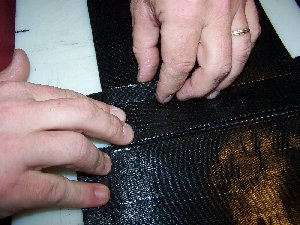 |
| 17. | Turn the bag over to the back side and place a piece of tape down both sides halfway on and halfway off, running the length of the bag from the flap to the bottom. Turn the bag back over and make two cuts on each piece of tape where you can fold it to the front without constricting the strap. My left hand in the photo is on the front strap and I am cutting with my right hand, but look at where the cuts are. One on either side of the strap. This way you can fold the entire piece of tape over the side to the front and the strap is still functional. At this point you can trim any that overlapped the bottom with your knife, but DON’T CUT THE BAGGIE! | 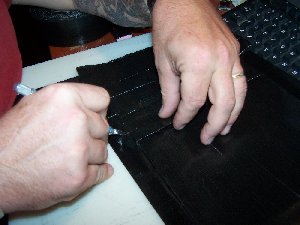 |
| 18. | Place a piece of tape on the bottom halfway on and halfway off. Fold it over to reinforce the bottom, and trim it off with your knife, but DON’T CUT THE BAGGIE! Now all that’s left is the flap. Line up one edge of your new pouch with the edge of the cutting board. Using the board to measure (not the pouch) measure over 1 inch as shown by where the knife is and cut a diagonal piece out of the flap from the bag opening to the end of the flap. | 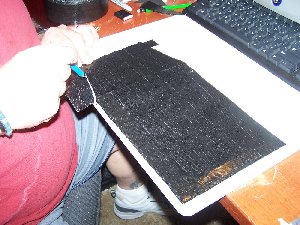 |
| 19. | Then turn the pouch over and do the same thing on the other side. | 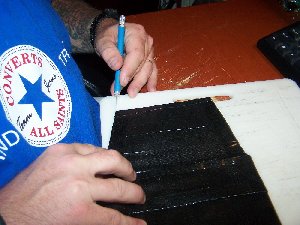 |
| 20. | If you remember the way you trimmed out the bottom by adding a piece of duct tape and folding it over, then trimming it with your knife, that is what you are going to do here on the diagonal sides of the flap. Finally take the other 7inch strip from earlier and trim out the very top, or the end of the flap with it, fold it over and trim off the edges. What you should end up with is something like this... | 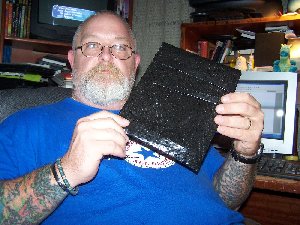 |
Safari Man has an additional method that does not require the use of a ZipLock bag, and those directions can be found in this photo album.
What kind of prizes should I leave for first finders?
Although you are not required to leave a prize, many letterboxers enjoy being the first finder and having a token of this accomplishment. From a thread on the boards letterboxers have suggested the following: leave a hitchhiker for the taking, a patch commemorating their find, a first finder sticker, first finder certificates, lino cutters or other boxing supplies, an blank log book, first finder magnets, key chain, Shrinky Dink awards, first finder custom buttons, or even gift certificates. Just be creative. Some suggest that the first finder prize either be related to the box, the planter, or the location. Others say that just finding the box is award enough.
Do not put explosives, ammo, knives, drugs, and alcohol in a Letterbox. Respect the local laws. All ages of people hide and seek letterboxes, so use some thought before placing a first finder.
Food items are ALWAYS a BAD IDEA. Animals have better noses than humans, and in some cases boxes have been chewed through and destroyed because of food items. Please do not put food or fragrant items in a Letterbox.
You may also be interested in this discussion on the Atlas Quest boards regarding first finders.
What is a seedling?
A seedling is a type of letterbox that moves; each finder is invited to take the entire box with them and carry it to another location and replant it. In constrast to some other types of nomadic letterboxes, however, the seedling has a specified destination. Once it reaches that destination, it is planted in a permanent hiding spot, the seedling listing on AQ is retired, and a new traditional letterbox listing is created.
The destination can be anything the seedling's launcher specifies, from general ("needs to be planted near an amusement park") to particular ("should be planted at the St. Louis Arch"). The intention behind a seedling is to provide a means by which a boxer/carver with an idea for a letterbox can create that box and set it in play even if he himself cannot travel to the place where the box needs to be planted.
Note that the launcher doesn't necessarily have to divulge the destination in the online listing. He could, if he's the secretive type, just mention that the box is a seedling but not mention where it's going. The finder wouldn't know where it's going until he found it and read the instructions inside. Of course, this might hinder its travel somewhat; if the destination were known, perhaps more finders would go out of their way to help it along if they're going that way anyway.
Typically the final traditional letterbox and the seedling share the same container. Hence, the container might have the name of the letterbox written on the outside rather than the name of the seedling. Or the launcher may have written the letterbox name on the outside and covered it with a label with the seedling name; once it reaches its destination, the label is supposed to be removed.
There is usually only one stamp inside a seedling, and that's the stamp that will be used for the traditional letterbox once it's planted. Most launchers won't opt to carve a separate stamp just for the seedling, as it hopefully won't be a seedling for long anyway, and once the box becomes a traditional letterbox the seedling stamp would just be discarded. As a finder of the seedling, you can use the letterbox stamp in your own log book, but be aware that if you later find the traditional letterbox after it's planted you'll be stamping with the same stamp again.
There are usually two separate log books inside a seedling. The one to be used with the traditional letterbox after it is planted is sealed shut with a notice not to open until it's planted in its final location. The log book for the seedling is often a few sheets of typewriter paper that can folded up and mailed back to the launcher once the box reaches its destination. There may even be a self-addressed and stamped envelope included.
If you find a seedling, note that there's no rule that says you have to move it. You can just stamp in and leave it be if you prefer. If you're not heading in the direction of its destination, it might be best if you leave it where it is.
If you move the seedling, you might want to leave a note in the hiding spot for anyone else that comes looking for it. Ideally, just write "You missed it!" on a leaf or something. Nobody will ever retrieve this note, so it's best to avoid littering by using something that's naturally supposed to be there anyway.
Once you have taken the seedling from its hiding place, you should log your find as soon as possible and write a note to the previous placer indicating that the seedling has moved on. Then that placer can retire his listing, preventing more boxers from looking for it there.
Once you plant the seedling in a new hiding place, create an entirely new listing on AQ. Use the same name as the previous listing except add a count. Usually the name of the initial seedling placement will end with "1", so the successive listings end with "2", "3" and so on. Even after retirement, these listings will remain on record at AQ so people can see how this seedling moved to where it was finally planted. Each mover gets a planting credit, too.
When the seedling reaches its destination, it should be planted as a traditional letterbox. The box name and the listing on AQ should be different than the seedling to minimize confusion. Any notes or mention inside the box of its travelling nature should be removed. To any future finders, this box should appear to be a regular traditional letterbox.
In fact, even people following the travels of the seedling online should not necessarily be able to discern that this letterbox was the result of that seedling. As far as they can tell, a seedling was retired, and then sometime later a new letterbox was listed. Only by checking the last finder on the last seedling and seeing what that finder planted sometime thereafter would anyone be able to figure out where the seedling went.
How do you adopt a letterbox once you have the owner's permission?
The owner of the letterbox is able to transfer the ownership to you by using the Edit Box option and changing the name of the owner. Only a registered owner or planter can change the owner of the box. The adopter does not need to do anything (and can't do anything) to transfer ownership.
Our class is going to plant a letterbox next week. Should everyone register their names oline?
Leave it up to the individual. Most students in a class will not continue letterboxing and creating accounts for them will be a waste of time and effort, so provide information about letterboxing websites, but let them choose if they wish to register or continue letterboxing.
In addition, please note that the terms of service require members to be at least 13 years old. There is material on this site that may not be appropriate for younger kids.
In addition, please note that the terms of service require members to be at least 13 years old. There is material on this site that may not be appropriate for younger kids.
How can I tell if there are any geocaches near the spot I want to hide my letterbox?
- go to http://www.geocaching.com
- hover over the Play link
- click on "Hide & Seek a Cache"
- do a search by zip code
- near the top of the search page that comes up, there's a link entitled 'Map this Location'.
Caveat: if there are nearby mystery/puzzle caches (? icon) or multi-caches (double cache icon), you won't know where the final cache or all the stages are located (you'll only see the starting point of the mystery or multi). The rule for mystery/puzzle caches are, the posted coordinates should be no more than 1-2 miles (2-3 kilometres) away from the true cache location. There is no proximity rule for multi-caches except that the stages and final must not be closer than .1 miles from another cache or stage in a multi.
Tags: geocache, geocaching, geocacher, geocachers
How do I list a letterbox with multiple planters or authors?
You can't. Atlas Quest only allows one planter and one author per listed letterbox, and there are no hidden ways around that restriction. Both the planter and author will get equal credit for the box and show up as a plant for both members, but it is not possible to list more than one person for each category. If additional people need credit for planting the letterbox or authoring the clue, give them credit in the clue and list them as a contact so they can still be notified of finds on the box.
How do I prevent my letterbox from going missing?
Letterboxes go missing for many reasons, but there are a small handful of reasons that are responsible for most missing letterboxes. Follow these suggestions to insure your box will live a long and happy life:
This cannot be stressed enough: The number one reason for missing letterboxes are other people. The more often your letterboxes are found and the more people who frequent the area where your letterboxes are located, the more likely they are to go missing. Urban letterboxes, therefore, are much more likely to go missing than rural boxes.
- Plant the letterbox in a hole (in trees, rocks, or whatever) that will hide the entire letterbox permanently and well. Many letterboxes are hidden in plain view and covered with nothing more than a few rocks or sticks—affectionately known as S.P.O.R.s (Suspicious Pile Of Rocks). The trouble with this method is that the rocks or sticks will often come off with wind or rain, or subsequent finders will not rehide the box sufficiently well so the box become plainly visible over time. On a similar vein, don't hide you box behind bushes that will lose their leaves in the winter.
- Don't hide your box near the biggest/most interesting tree/rock/whatever in the area. People and kids are drawn to such areas and tend to poke around them more. Hide your box in a smaller nearby tree that is more likely to be overlooked by passerbys.
- Don't hide your letterbox where it looks like kids have trashed the area with beer cans and who knows what else. Besides trashing your box when they find it (and they will find it), finders aren't going to want to wade through such areas to find your box to begin with.
- Consider natural hazards that can destroy or remove your letterbox such as forest fires, floods, or badly decayed logs that won't be around much longer. Rock hiding places last the longest and living trees will likely be around for many years. Logs and stumps can decay and fall apart deceptively fast. This will vary with the local climate, but even dry, cold areas in where things decay slowly may cause trouble for log and stump locations; insects (such as fire ants) love nesting in these places.
- Smaller boxes are more easily overlooked than larger ones. The smaller a letterbox is, the less likely it will be discovered.
- Camouflaged letterboxes are more easily overlooked than plain, plastic containers. Consider covering your letterboxes with camo duct tape or gluing leaves, twigs and other natural materials or paint it natural colors so it blends in with its surroundings better.
- Hide your letterboxes away from natural stopping points for hikers. Everyone stops to admire a stunning view or waterfall, and they'll likely linger and explore such locations far more often than a nondescript trail ten feet away from the view.
- If you have to explain how to hide the letterbox properly, you can be certain that there will be people who find it who will not follow those directions. Idiot-proof your boxes and hide them in locations that don't require special directions.
- Consider traffic, when placing your box. If the area is extremely high traffic, not only is someone likely to find the box by accident, but those who find the box will have trouble obtaining the box without being seen by non-boxers. Also, if the area has passers-by, a good idea is to provide information on times when there is less traffic. And if there's some area that will provide an "alibi" for the finders (picnic areas, benches, etc.), to make it less obvious that they're boxing, all the better.
- Do not use "fresh" ground cover to hide your box. If you tear up swaths of grass for cover, the difference in color (green grass vs. decayed, yellow and brown grass and leaves) will shout out (figuratively), "THERE'S SOMETHING HIDDEN HERE!" until the grass desiccates to the surrounding color.
- Do not make it necessary for finders to tear the place up, looking for the box. If you say "in the pile of stuff under the tree," and there are yards and yards of stuff, people are going to tear the place up, making it more obvious that something is hidden here. Even worse, it gives letterboxers a bad name when people associate the damage with us, and it could result in letterboxes being banned from the area.
- Hide your letterbox in a location that will not cause a 'social trail' to start. People will start following the social trail to see where it goes increasing the likelihood of discovery, causes damage the can get letterboxing banned from the area, and those with small bladders may use your letterbox as a restroom. If you can't hide your box directly alongside a trail, hide it off trail that's on a hardened surface such as rock or has no grass, flowers or undergrowth that can be easily trampled.
This cannot be stressed enough: The number one reason for missing letterboxes are other people. The more often your letterboxes are found and the more people who frequent the area where your letterboxes are located, the more likely they are to go missing. Urban letterboxes, therefore, are much more likely to go missing than rural boxes.
How can I help prevent my stamp from being traded out for a trinket?
Occassionally geocachers stumble upon a letterbox while searching for geocaches. When they do they may assume that what they found is a geocache (or terracache or some other version of the geocaching game). Geocaching involves the trading of trinkets whereas letterboxing involves the trading of stamp images. Your stamp may inadvertently end up traded out for another object. The geocacher means no harm because they are playing the game the way they know how, they may never have heard of letterboxing and don't know that letterboxers exchange stamp images not trinkets.
So one way to prevent your stamp from being traded out would be to educate those that stumble upon your letterbox.
So one way to prevent your stamp from being traded out would be to educate those that stumble upon your letterbox.
- Short note: Leave a short eye-catching note in the box. Something that says: "Please do not take the stamp. Leave it in the box." You may also want to add a short blurb about what the letterboxing process involves: "Letterboxers exchange stamp images. Take an impression of the letterbox's stamp, leave an impression of your signature stamp." I personally would not leave a lengthy information sheet explaining all the intricacies of letterboxing folded up and tucked away in the box. Many people may assume it's a geocaching information sheet and they already know what geocaching is so they're not going to unfold the paper to see what's written on it. They also may not feel they have the time to sit and read a 250 word document on letterboxing. You want to get the most important information out to them....Do not take the stamp.
- Write on the back of the stamp: If there's room on the back of the stamp write: "Do not take. Leave in box." for added security. Caveat: ink will bleed over time on some rubber material. You may have to re-write on the back of the stamp when you do maintenance visits. Example of stamp with penned note on the back.
- Check geocaching.com: The other thing you might want to do to prevent your stamp from being traded out -- see what geocaches are nearby when you go to plant your letterbox. See: How can I tell if there are any geocaches near the spot I want to hide my letterbox? You might even consider planting within 528 feet (.1 miles, 161 meters) of the geocache because once a geocache is published no other geocache can be planted within 528 feet of that cache. If you plant say 350 feet away from the cache that insures that another cache will not be planted next to (or in some instances, on top or below) your cache.
How do I know if the place I am planting my letterbox is to public?
Some places are too public, your letterbox could be found easily by a non-letterboxer. If it is a common town area with main streets close by check and see if there is anyone around (5 people is a good limit). Anyone could see you and pick it up thinking it was trash. No one is stopping you from hideing it there, but BEWARE. If you still decide to plant your letterbox in a major public area try finding a REALLY good hiding place, under a rock, in a crevice, etc.
Why can I no longer adopt abandoned boxes?
Atlas Quest used to have a policy allowing people to take ownership of box listings that appeared to be abandoned on Atlas Quest. This policy was discontinued after a handful of people who had failed to maintain their listings on Atlas Quest later came back years later, absolutely irate about their boxes being “taken over.” It didn’t matter that we tried to contact them about their listings. It didn’t matter that they had not logged into Atlas Quest for years. They felt it was unfair and a terribly rude thing to do.
So the current policy is no longer allow adoptions without the owner’s explicit permission, regardless of how long the box has been abandoned.
The policy of not allowing adoptions extends to creating new listings on AQ of adopted boxes. In other words, if you adopt a box on LbNA, do not list it on AQ without the explicit permission of the original owner.
You can, however, foster an abandoned box, which allows you to get notifications about the box and include an addendum on the box. You will not, however, be able to edit the box.
You may personally choose to maintain the physical letterbox—and, in fact, we hope you do so the box doesn't become litter. You do not need to adopt or foster a box to replace a full logbook, a cracked box or torn Ziplocs, although you are certainly welcome to foster the box is you'd like.
We’ve taken several measures to reduce the clutter of abandoned letterboxes in searches:
As a whole, these measures seem to provide a nice balance between respecting the ownership of boxes listed on AQ while protecting AQ from runaway abandoned listings cluttering up the results.
So the current policy is no longer allow adoptions without the owner’s explicit permission, regardless of how long the box has been abandoned.
The policy of not allowing adoptions extends to creating new listings on AQ of adopted boxes. In other words, if you adopt a box on LbNA, do not list it on AQ without the explicit permission of the original owner.
You can, however, foster an abandoned box, which allows you to get notifications about the box and include an addendum on the box. You will not, however, be able to edit the box.
You may personally choose to maintain the physical letterbox—and, in fact, we hope you do so the box doesn't become litter. You do not need to adopt or foster a box to replace a full logbook, a cracked box or torn Ziplocs, although you are certainly welcome to foster the box is you'd like.
We’ve taken several measures to reduce the clutter of abandoned letterboxes in searches:
- On the Advanced Search page, you'll see an option to Hide Abandoned Boxes which is automatically selected for most searches by default. Any boxes whose owners have been MIA for 12 months or more will not be included in the search results if this option is checked.
- Also on the Advanced Search page is an option to Hide Strikeouts—boxes with an usually large number of consecutive attempts on them. If people are searching for abandoned boxes and coming up empty, this is a way to reduce that clutter. Most searches default to hide any box with three or more consecutive attempts.
- And another option from the Advanced Search page is to Hide Most Ignored boxes. Maybe people who look for a box but don't find it won't record it as an attempt, but they will often ignore the box to de-clutter their searches. If enough people are ignoring it, there might be a good reason for it!
- For members who are logged into Atlas Quest, you can adjust the 12 month span that a box is considered abandoned in your Letterbox Preferences. You can also change whether or not to show or hide abandoned boxes by default.
- For members who are logged into Atlas Quest, you can adjust the number of strikes it takes to strikeout a box from your Letterbox Preferences.
- And again, for members who are logged into Atlas Quest, you can adjust the number of people who are ignoring a box from your Letterbox Preferences before it joins the most ignored list.
- Any abandoned box with a status of active will automatically be converted into a status of unknown if at least one attempt is recorded on it.
- Any abandoned box with a status of unknown will automatically be converted into a status of active if a find is subsequently recorded on it.
- Any abandoned box with 5 or more strikes will be retired.
- Any abandoned box that’s listed as unavailable will be changed to retired.
- Comments on abandoned boxes are automatically approved immediately, so it is possible to communicate information about the letterbox through that means.
As a whole, these measures seem to provide a nice balance between respecting the ownership of boxes listed on AQ while protecting AQ from runaway abandoned listings cluttering up the results.
What are GPS end points?
This is a place where you can mark the specific GPS coordinate of a given box. It will record latitude and longitude coordinates to 6 digits after the decimal, which should be sufficient to mark the location of a box within a few inches or centimeters. Commercial GPS devices are typically only accurate to within several feet.
Only the administrators for a box (owners and planters primarily, but that also includes AQ admins since AQ admins are de-facto admins for all boxes on AQ) can see the GPS end points. Searchers for the box will not be able to see them. It is a useful tool to help locate your own boxes if the landmarks in your clues change or if a searcher looks for a box and reports the location where they searched, you can check if they were actually looking in the right area or not.
It's meant as an administrative tool, and is entirely optional.