The Art of Stamping
Stamping With Style
Anyone can slap some ink on a stamp and get the image to a piece of paper. But it's not difficult to go that extra mile to make a stamp image really pop! And that's what this section is all about. We'll cover several ways to make your images come alive and move your two dimensional stampings into the third dimension: Color.
- Tips and tricks to add colors before the stamp-in.
- Color can be added after a stamp has already done its job—this section will show you how.
- Create a mural of sorts by using the same stamp multiple times.
- You can surround your stamp with a whole fiesta of colors simply by drawing a background around it.
- Some stamps have multiple layers that can be sequentially stamped on top of each other. You won't find these often, but when you do, they can be awesome!
- Here we'll cover concepts on combining several techniques already covered.

Adding Color Before the Stamp-In

- Breathe heavily on the stamp just before stamping in. Sometimes it can take awhile to fully color an intricate stamp, and by the time you've applied the last color, the first color has already dried. Breathing heavily on the stamp just before stamping in moistens the dried ink again so the color will transfer to paper.
- If the stamp contains text, color it in a different color. Many simple stamps contain an image with small bit of text near it—usually bearing the location where the box is located or the name of the letterbox. Coloring the image and text with two different colors can really go a long way towards a beautiful image!
- Apply colors from inside out. Particularly for large stamps. If you colored the edges of the stamp first, you might accidentally touch or mess up work you've already done while going past it to other colors in the interior of the stamp. When you do work on the edges, orient the the stamp so the edge you're working on is on the right (if you're right-handed) or on the left (if you're left-handed).
- Apply the lighter colors first, and finish with the darker ones. This technique is especially useful for shading. Let's say you have a stamp that's supposed to be a bird with a light blue color. To shade it, you'd color the entire bird with a light blue marker. Then color progressively smaller areas of the bird darker using dark blue, dark purple, and possibly black. Areas of the bird that are highlighted typically have been carved out from the stamp, so they'll appear white adding to the shading effect even more.
- Objects become lighter the more distant they are. The next time you see a series of mountains on the horizon, notice the closest ones have vibrant colors while the mountains in the distance tend to lighten in color the farther away they are. Use this information—and exaggerate it—in coloring your stamps.
- If you have only ink pads rather than markers available, there's still hope! First, what kind of ink pads do you have? The really small ones in the shape of a square or a cat's eye? Those are best for multi-color work. Use the sharpest corners available to do detailed coloring. As a rule of thumb, start with large color areas and work towards more detailed areas. It's okay to get the wrong color ink on part of the stamp if you haven't colored that part yet. Just wipe off the excess ink with a tissue before starting with the next color.
- Several ink mediums can be used in conjunction with each other. For large areas, go ahead and use those large, bulky ink pads. Then switch to markers for more detailed coloring.
- Combining colors can be very effective—or not! Most of the time, you'll want to make sure you're applying color to a "clean" stamp—a stamp wiped clean of inks previous letterboxers have left behind. However, you can sometimes get wonderful affects by not doing this. Other times, the result can be quite horrible. I once found a nice stamp of a bird—but not really the sort that lends itself to multi-colored stamping. However, I could tell the previous stamper used a nice, bright pink. So I stamped in using purple, which blended into a beautiful purplish-pink color I'll probably never be able to repeat even if I wanted to.

Adding Color After the Stamp-In

- You can use any type of medium to fill in colors: markers and colored pencils are most common because they're the quickest and easiest, but you could also use watercolors, oils, chalks or whatever else suits your fancy.
- Wait for the impression to dry before coloring in the image. This reduces having two colors bleed—which is especially noticeable if you've got a very dark color next to a very light color.
- Outline light colors with a dark one. This gives your stamp a cartoon look, but makes the light color much more noticeable. Let's say you find a stamp of Jack. You know, of Jack in the Box fame. This is a terrific example where you'd be better off coloring the outline of Jack's hat black, stamp into your logbook, then color the inside yellow. Exactly how you work this depends on the how the stamp was carved. If the stamp was carved where the hat is hollow (such as the one I carved shown to the right), use black to color the hat (or rather the hat's edges) before stamping in. Then after stamping in, color in the hat with yellow. However, if Jack's hat was NOT hollow, it's trickier. You can color the hat yellow, stamp in, then draw the black border around the edges of the hat to help define it.
- Color from the inside of an area outward. In the example of Jack's hat, you'll want to color in the yellow from the inside of the hat towards the edge. That way, you can color up to the edge of the hat without worrying if the black ink from the edge mixes with the yellow from the marker. The yellow won't show up against the black. If you started from the edge of the hat and colored inward, the black ink from the edge would smear into the yellow you're coloring. Whenever the tip of your yellow pen crosses onto the black edge of the hat, be sure to "wipe off" the pen's tip before putting it back into the interior of the hat again.
- Adding color after stamping in can be done at any time. Don't feel pressured to color in your stamp while it's raining around you and time is ticking. One of the benefits in adding color after stamping in is that you can add it at any time after stamping in—even days or weeks later!
- You can add dark colors after stamping as well! While most of this discussion has been about light colors like yellow, any part of a stamp that's been carved out will appear white after stamping in (assuming you are stamping onto white paper). You can color any color into these spaces! In one stamp I found, I colored in ALL of the white areas left over, and the stamp now looks more like a mural than a stamp. (Which could be good or bad depending on if that's the look you were going for.)
- Turning stamp images into cartoons. This technique works especially well for cartoonish-looking images. Use a black ink pad to stamp the image, then color in the white spaces like a coloring book. The result should be a very cartoonish-looking character.

Multiple Stampings

The Murder At Gabriel Park! series includes a footprint as a stamp for one of the boxes. Instead of stamping in the image once, use the footprint several times to make it look like someone walked or ran across the page.

This tutorial can't cover every potential use of multiple stampings, so use your imaginations! Study a stamp before you stamp and figure out if it's a good candidate for multiple stampings, perhaps by using multiple colors or twisting the stamp around to make it look like a different stamp.
Draw Backgrounds Around Your Stampings

If I wanted to get even more elaborate, I could have drawn shipwrecks in the background, a rescue helicopter overhead, kids swimming in the surf, divers checking out a coral reef—any number of possibilities. It doesn't even have to be limited to drawing, either. I could have cut out pictures of shipwrecks and other underwater objects to paste into my mural. Or a combination of drawing and pasting pictures.
Your imagination is the limit! The technique isn't much different than what a scrapbooker uses for their photos and other prized possessions, except in this case, it's the stampings that are the center of attention.
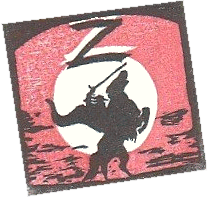
Overlapping Stamps
This method of adding multiple colors to a stamp requires that the stamp actually be designed for this purpose. You won't find many boxes out there with layered stamps, but they do exist and can be so very cool when it works!
This Zorro stamp is a layered stamp. One stamp was carved with the sunset and extra depth to the famous Z (colored red in this image), while the second stamp of zorro (colored black in this image) was stamped directly on top of the first stamp. By itself, the Zorro stamp is nice, but with the red background—WOW!
You should stamp dark colors onto light ones if you don't want the colors to look like they've blended. The greater the contrast, the more it will look like two different colors side-by-side rather than two, overlapping colors.
The most interesting use I saw of using multiple, overlapping stamps was a blank one! The stamping was a scene overlooking a tropical beach with a good, solid border around the scene. I inked the back of the stamp—completely uncarved—with a bright orange color on the top half and a light blue color on the bottom half and stamped away. Then I inked the front of the stamp with black which I stamped on top of the first stamping. Instead of a white background, the scene now had a beautiful orange sunset, light blue waters, and black palm trees that looked like silhouettes, none of which looked drawn in afterwards with a colored marker. It was a wonderful effect, and it used the plain, boring back side of the stamp. (I hesitate to post the image—though it is nothing short of astonishing—but I didn't carve it and don't have permission to display it here.)
Combining Techniques
There's nothing preventing you from using multiple techniques at the same time. The school of fish shown earlier were stamped multiple times, then two were also colored in later. The birds here were mostly colored directly onto the stamp, but notice the beak of the toucan and the feet of both birds were colored in later.
Not all stamps work equally well for various techniques. Before stamping in, consider the possibilities of various stamping techniques and how they might work together to create an imagine that will all but jump off the page!
