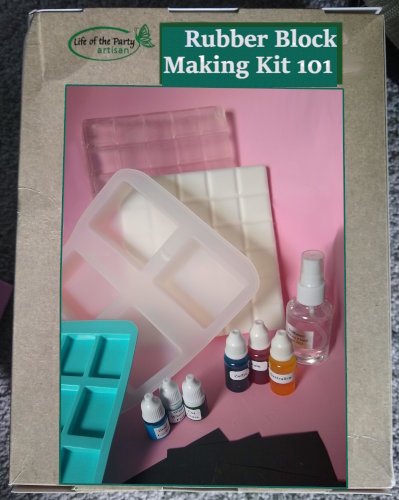
DIY Carving Block Kit
Have you ever been unhappy with your carving block options? Perhaps you just don’t like the color of the carving block. (Pink, really? Why?!!) Or perhaps you’re more concerned about the functionality of the carving block. You need a firm block for fine details, but where’s the carving block that’s so stiff that it can actually bend knives while you cut?
Atlas Quest has been working with suppliers to develop the first-of-its-kind DIY carving block! Designed by letterboxers, for letterboxers!
I’m so excited to finally announce this project!
How it works
Creating your own carving blocks works much like creating your own candles or soap kits. If you’re familiar with those, you already know how it works. You melt down the base, a polyurethane material composed of organic units joined by carbamate links, which can then be poured into a mold which solidifies when it cools.
After melting the base material, you can add colors, scents and even a stiffener that allows you to control how soft or hard the carving block solidifies into.
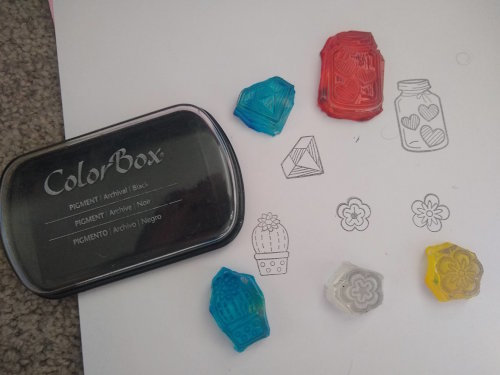
After curing in the mold for at least two hours, you can pop them out and start carving! Or, if you find the surface too smooth for your liking, you can use the provided sandpaper to rough up the surface to your liking.
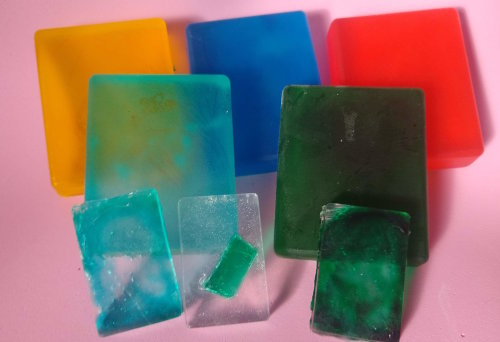
Choose a color! Any color!
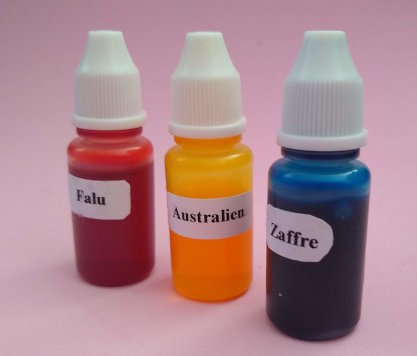
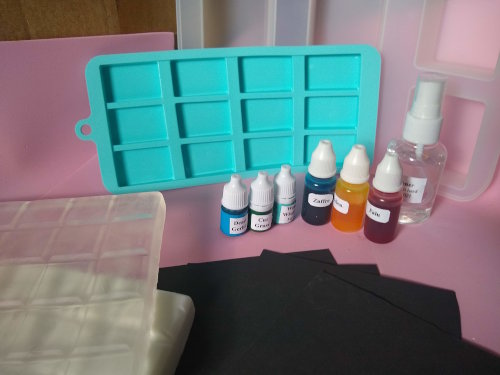
The basic kit includes the three primary colors: red, yellow and blue. Or, technically included with the kit: falu, australien and zaffre respectively, but they’re specific shades of red, yellow and blue. Well, okay, the australien is more like goose-turd green but with a yellow slant, but more-or-less yellow.
These, of course, can be combined to create pretty much any color of the rainbow! It’s also possible to create multi-colored carving blocks, but I can’t in good conscious recommend that. It is surprisingly difficult to carve on anything except solid blocks of color. It might be possible to add a very thin color layer on the surface so when you carve, you can see a different color where you carved out material. I didn’t find this particularly helpful, though. I had trouble getting the color thin enough to be useful. Not saying it can’t be done, but I never got satisfactory results out of it.
The carving medium comes in both clear and white options, however, so you can create carving blocks that look both translucent or opaque depending on the look that you’re going for.
Scents
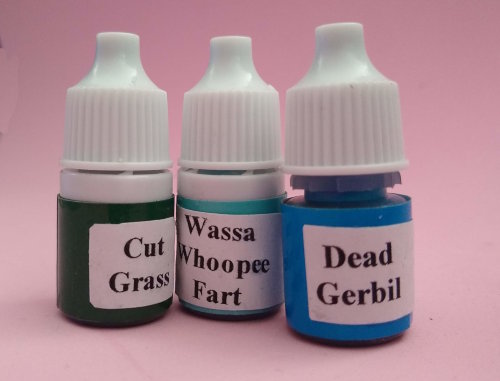
I know what you’re thinking—you don’t want your stamps to smell. It’ll attract rodents! Well, I thought of that too. It’s not that a stamp should not have a smell, but rather it should smell natural! So it blends in with the surrounding smells. So the kit provides four scents that can be used: cedar, cut grass and... okay... these other two are unpleasant scents meant to be muggle deterrents, so do keep that in mind. The other two scents are the Wassa whoopee fart and dead gerbil in honor, of course, our very own Wassa and a real-life (but dead) dead gerbil. Not only is the scent itself enough to discourage muggles from taking too close of a look at a box, but it also tends to attract hoards of flies at certain times of the year which can have an additional discouraging effect.
Stiffener
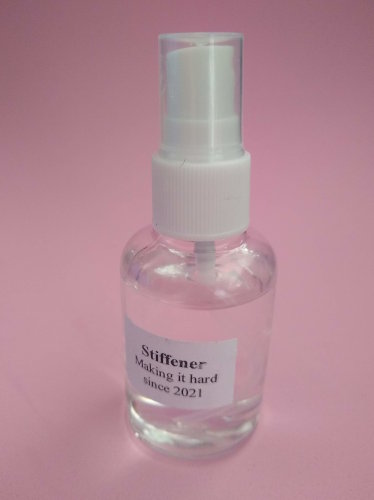
But the real joy in creating your own carving blocks is that you can mix in a stiffener to make the carving block as stiff as you prefer. Add nothing, and it will “cut like butter.” Add an entire bottle and it’ll be as hard as concrete! I find three drops per 1/4 cup of carving block is sufficient for a material more-or-less the stiffness of the pink stuff. Eight drops creates the stiffness of the original PZ-Kut.
It might take a little experimenting to figure out what level of stiffness you prefer.
Shaping the carving blocks
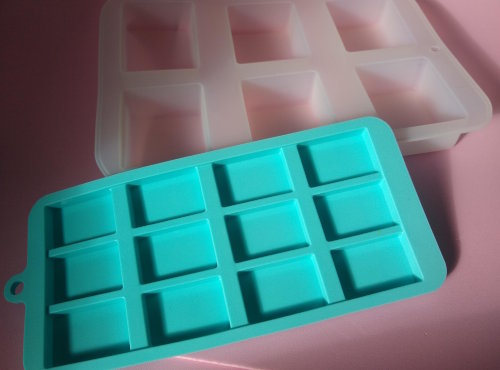
Carving blocks, logically, make sense as blocks, so you’ll find our kit comes with two silicone mold options that make simple rectangular blocks. One of them creates relatively small blocks—perfect for small stamps. Especially those used as hitchhikers or cooties, for instance. The other creates larger bars about 2½ x 3 inches. Technically, there’s no reason you can’t buy additional silicone molds with all sorts of shapes, but you’ll need at least one side that ends up being flat enough for carving. So you could use a flower-shaped mold. The stamping surface, however, would have to be uncovered side of the mold that lies flat.
To use them, you simply melt the carving material in a microwave, mix in your desired colors, scents and stiffener, then pour it into the molds until it cools.
Roughing up the surface

Out of the silicone molds, the surface of the carving block can be extraordinarily smooth which isn’t the best for picking up ink, so the kit includes 1500-grit sandpaper to rough up the surface a bit.
Reuse shavings
Unfortunately, the shavings left over after carving your stamp cannot be remelted and reused. During the curing process, there are one-way chemical changes to the bonds that cannot be undone.
However! This does not mean that the shavings cannot be reused. You can mix them into a new batch and they will solidify in place, basically merging into the new block. Admittedly, it’s not an ideal solution since they will likely have a slightly different stiffness than the new material around it and trying to carving through a carving block with a variable stiffness throughout it is challenging at best. However, if you have make a carving block that’s 1 cm deep, you could mix in the used shavings in the bottom half then pour a pure, fresh layer of carving material over it. Just remember that that side of the carving block with the reused shavings won’t be suitable for carving.
Pre-order now!
So that’s the DIY carving block in a nutshell! I’m sure some of you will figure out some other creative uses or tweaks to the main kit, and I can’t wait to hear about it! =)
I’m not sure how much demand there will be for this kit, however, so I’m taking pre-orders. There can be quite a savings if I order 1,000 kits rather than just 100 kits (for instance)— so if you’re interested, put in an order now! I won’t collect any payments until it’s ready to ship. (It’ll likely take a couple of months to manufacture and ship to the United States from Vietnam, but I will keep you updated!). The initial kit will cost $49.95 which has enough material to make about twelve 2½ x 3" blocks, unless there’s enough interest to manufacture at least 200 kits at which point the price should be $39.95. If there’s enough interest and I can manufacture at least 1,000 kits, the price could be as low as $29.95/kit. But assume the worst: I’ll take pre-orders for $49.95/kit and if there is enough interest, I’ll charge less.
Thanks for your support! =)