Help: Trip Planner
- What do the attributes on trips represent?
- How do the origin, destination, and waypoints work?
- How does the segment data work?
- How does the map work?
- How can I restrict my trips?
- What do the subtypes on trips represent?
- How do I add a custom trip?
What do the attributes on trips represent?
| Attribute | Description |
 | There are rest areas along the route. They may not necessarily be a lot of them, but there are at least a few along the way! The term 'rest area' can be used liberally for walking and bicycling routes. Perhaps a trail with shelters, or a convenience store along a bicycling route. |
 | A historic route, typically famous (or infamous!) for one reason or another. |
 | An actual hiking trail that hikers, pilgrims and other adventurers follow. |
How do the origin, destination, and waypoints work?
The origin and destination are self-explanatory, and both are required for creating a new route. You can use any location that the geocoders on AQ can find. You can use addresses, latitude and longitude coordinates, zip codes, and any other valid locations that would work with a regular letterbox search.
The waypoints are optional, but if you include them, it will insure the default route that AQ creates goes through each of these points, in order, between the origin and destination. Again, any valid locations used for letterbox search will also work with waypoints. A maximum of eight waypoints is allowed, and multiple waypoints must be separated with semicolons.
If AQ is unable to create a precise route from your origin to each waypoint to the destination, it will create straight lines between each point and you'll have to manipulate the route further if you want any precision at all.
How does the segment data work?
At its core, the route is created from a series of points that mark the route. The map is pretty and all, but the raw data that AQ uses to generate those maps comes from this section. It's a series of latitude and longitude coordinates, one coordinate per line. There's no real limit to the number of coordinates allowed—some long, detailed routes have over 5,000 points.
But... there are a couple of less obvious tricks to the segment data. First, you'll usually see coordinates displayed, but technically, any valid location that the geocoders can figure out can be used. Which is often times useful when creating an entirely new route. You can list every city, town, and podunk along your route, one per line, save your route, and AQ will generate a rough path of your route which you can edit further as necessary. (As soon as you start editing the route with the map, however, the locations will be converted into coordinates.)
Another useful tool—sometimes, when editing the map directly, you might accidentally add new segments. It's easy to accidentally click on the map when you meant to add or edit a vertex, and clicking on the map will add a new segment to the end of the path. There's no way to delete a vertex from the map—none that anyone has been able to figure out, at least!—but since the new vertex is added to the end of the path, you can scroll down to the end, remove the last line, and save your changes.
When you edit the segment data directly, your changes will not be reflected on the map until you save your changes, and if you try to edit the map before saving your changes, your changes will be overwritten with the map data. In a nutshell, don't edit or use the map until you've saved any changes you make to the segment data. To save your changes, clicking any of the page buttons will do the trick. (Except the Cancel button, for obvious reasons!) You don't actually have to Save the route to save your changes. Most of the time, you'll likely want to click the Route button—it will save your changes and reload the map so you can see your changes and make any additional adjustments.
How does the map work?
To zoom in or out, use the controls on the left side of the map. You might be tempted to double-click the map to zoom in—a common navigation technique among maps—but a click on the map will add a new segment to your route and you would end up with an extra segment you didn't want and the map will not have zoomed in.
To add a new segment to the end of the route, click on the map where you want the new segment drawn out to.
To edit an existing vertex, click and drag a solid square that marks the end of the segment.
To add a vertex between two existing vertices, click the semi-transparent square between the two solid vertices and drag it to the new location. When you let go of the mouse button, the new vertex is automatically added.
So far as anyone has been able to tell, Google Maps provides no method of removing a vertex once it's been added. You can delete a vertex from the raw segment data below the map, but more often, it's just easier to move the unnecessary point to a point along the route. Better to have too many points than not enough! The excess points won't hurt anything, though.
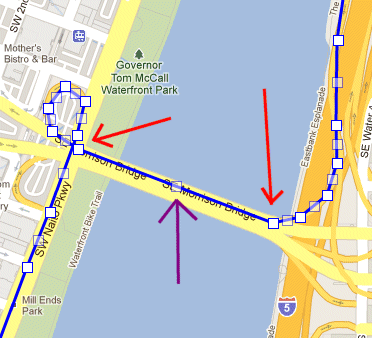
The image below has two red arrows—they point to 'solid' points. Those are points that are part of your route and will have a corresponding location in the raw segment data. The purple arrow points to a semi-transparent point—those are always located halfway between solid points and are used for creating new points between two existing points.
To add a new segment to the end of the route, click on the map where you want the new segment drawn out to.
To edit an existing vertex, click and drag a solid square that marks the end of the segment.
To add a vertex between two existing vertices, click the semi-transparent square between the two solid vertices and drag it to the new location. When you let go of the mouse button, the new vertex is automatically added.
So far as anyone has been able to tell, Google Maps provides no method of removing a vertex once it's been added. You can delete a vertex from the raw segment data below the map, but more often, it's just easier to move the unnecessary point to a point along the route. Better to have too many points than not enough! The excess points won't hurt anything, though.
The image below has two red arrows—they point to 'solid' points. Those are points that are part of your route and will have a corresponding location in the raw segment data. The purple arrow points to a semi-transparent point—those are always located halfway between solid points and are used for creating new points between two existing points.
How can I restrict my trips?
By default, any trips you create will be private—only you will be able to see them. If it's a route that you think others might be interested in using, however, contact an admin and we might make it available for others.
As a general rule of thumb, the only routes that are made public for everyone are major roads that are intended for cross-country travel. In the United States, that includes the Interstate system. In Canada, it includes the Trans-Canada Highway system. Other routes, even long ones that do span much of the country, probably won't be added.
As a general rule of thumb, the only routes that are made public for everyone are major roads that are intended for cross-country travel. In the United States, that includes the Interstate system. In Canada, it includes the Trans-Canada Highway system. Other routes, even long ones that do span much of the country, probably won't be added.
What do the subtypes on trips represent?
| Attribute | Description |
 | The route represents a driving route. (The vast majority of routes are driving routes!) |
 | The route represents a walking route. Obviously, this applies to long-distance trails such as the Appalachian Trail, but it can also represent walking routes through cities and involve road walks. |
 | The route represents a bicycling route. |
 | The path follows a route that can be taken via public transit—as far as Google can determine. |
How do I add a custom trip?
Check out Green Tortuga's video tutorial about creating a custom trip with the trip planner: