How do I make a planter’s pouch?
A planter’s pouch is a thin letterbox that can easily be tucked into cracks and crevices in urban locations that often are otherwise difficult to hide. To create one, follow mstrwndl’s helpful tutorial:
Safari Man has an additional method that does not require the use of a ZipLock bag, and those directions can be found in this photo album.
| # | Description | Sample Photograph |
| 1. | The first thing you are going to need is Duct Tape. Big Lots (this is not an endorsement) has duct tape for $2.49 a roll. I have seen rolls half the size at other stores for $6.00. Next you are going to need a 2 qt. Ziplock freezer bag. The double seal bags work the best. | 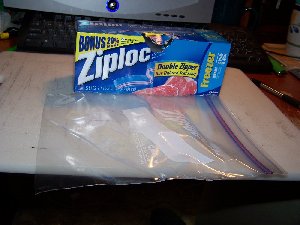 |
| 2. | If you have a cutting board and an X-acto knife, we are ready to start. Take a black Sharpie marker and make a mark 7 inches from the edge of the cutting board, and then another at 9 inches. | 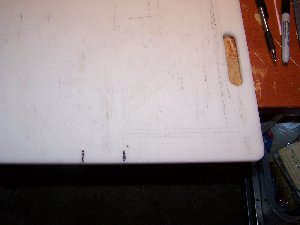 |
| 3. | Next measure two pieces of tape out onto the cutting board, one at 7” and one at 9”. The marks are so that you don’t have to grab a ruler every time you make a pouch. | 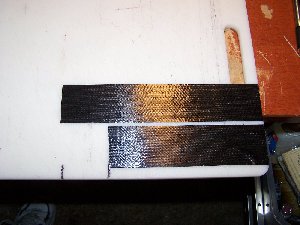 |
| 4. | With the X-acto knife, split the 7” piece lengthwise and leave it where it is. It won’t be in the way. You will come back to it and use both pieces, later. | 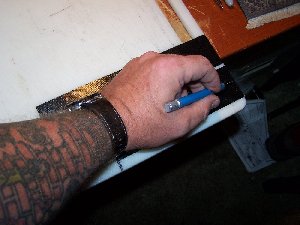 |
| 5. | With the 9” piece, measure 1” from the end and ½” up from the bottom. Make a slice straight down to the edge. I know this sounds confusing but check out the pictures. Do this on both ends and fold the center up in the back. | 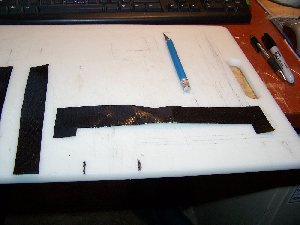 |
| 6. | Rotate the 9” piece over 180º and do the same thing on the other edge. The next picture will show you what you should end up with. This will end up being the strap. Set it aside and don’t let the sticky tabs on each end get messed up. | 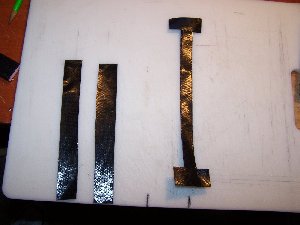 |
| 7. | Now look at a Ziplock bag. On one side there is writing. This side is about 1/8 inch shorter than the other side. We will call the side with the writing (the short side) the front. The other side (the long side) is naturally the back. You will notice this length at the place where the ink pen is pointing in the photo. | 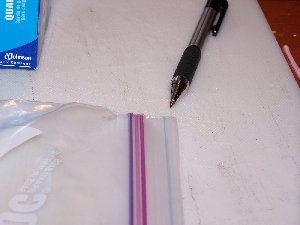 |
| 8. | Lay the baggie front side down and cover it with duct tape. You want the tape to hang off the bottom of the bag at least ½ inch. You want the tape to hang off the sides about 1 inch. It would be great if the tape hung off the top between 4 and 5 inches. This will be the flap. Overlap the pieces about ¾ of an inch with each strip of tape applied. It should take 6 or 7 pieces of tape to cover the bag. (see photo) The ink pen and knife are only to show the bag edges. This should give you an indication of how much overlap you will have. | 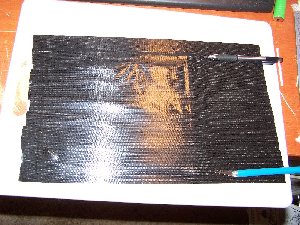 |
| 9. | Now, peel the whole thing up and flip it over. At the bottom corners of the baggie make a slice all the way straight down making sure not to cut the baggie, and fold the middle up as indicated in the next photo. | 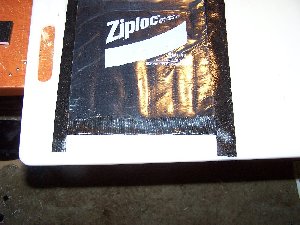 |
| 10. | You are looking at the front side of the baggie, now. Look at the point where the difference in length occurs and make a cut from the edge of the baggie to the edge of the tape on both sides. | 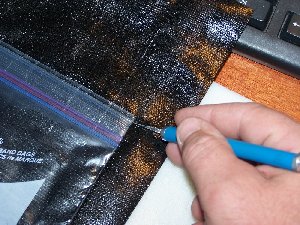 |
| 11. | When you get this done, fold the sides over and then fold those little end tabs to the back. Don’t cut them off as they serve to reinforce the corners. | 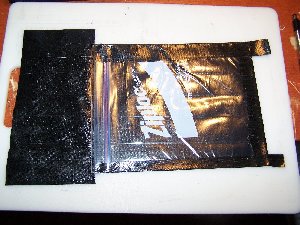 |
| 12. | Now that you are this far along you need to turn the bottom of the bag away from you and the sticky flap toward you. Take a piece of duct-tape and cover it crossways, making sure to cover the 1/8 inch difference in the back of the bag. (see photo, and disregard the little pile of PZ flakes on the left. They make great ice cream toppings.) |  |
| 13. | Now cover the front of the bag the same way you did the back of the bag making sure that you don’t overlap on the top. You want to go up to the edge of the bag and not off the bag at all. Look at where my left hand is in the next photo. You should get the idea. My finger is barely holding the tape down. | 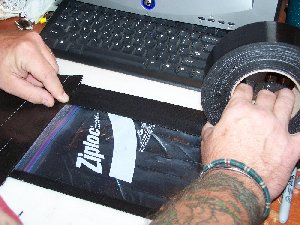 |
| 14. | Now that the front is covered make the same cuts at the bottom to fold and tuck that you made on the other side. If you don’t remember what you did, look back a step or two. The photos haven’t gone anywhere. While you are trimming the bottom, go ahead and fold the sides over as well. Now, somewhere, you should have two 7” strips that are narrow, where you cut the 7” strip earlier. You want to take one of them and place it half way on and halfway off (length wise) the tape edges on the front of the bag. | 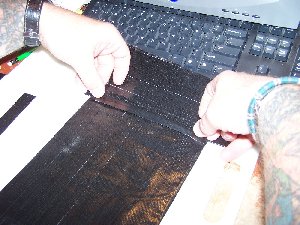 |
| 15. | Then go ahead and fold it over to hide the overlapped, exposed edge of the front of the bag. | 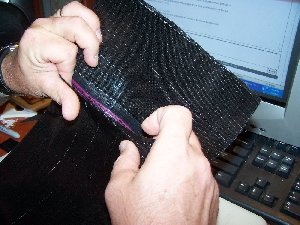 |
| 16. | There! No, wait... we’re not finished. Grab the 9” piece that you cut and folded while ago, to make the strap. Place your finger on the front of the bag and find where the seal is. You can feel it. Now that you have found it drop down about ½ inch and place the strap on evenly and fold the sticky tabs around to the back. | 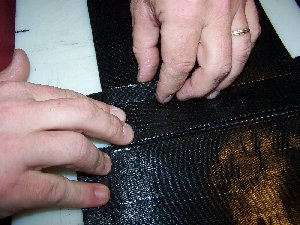 |
| 17. | Turn the bag over to the back side and place a piece of tape down both sides halfway on and halfway off, running the length of the bag from the flap to the bottom. Turn the bag back over and make two cuts on each piece of tape where you can fold it to the front without constricting the strap. My left hand in the photo is on the front strap and I am cutting with my right hand, but look at where the cuts are. One on either side of the strap. This way you can fold the entire piece of tape over the side to the front and the strap is still functional. At this point you can trim any that overlapped the bottom with your knife, but DON’T CUT THE BAGGIE! | 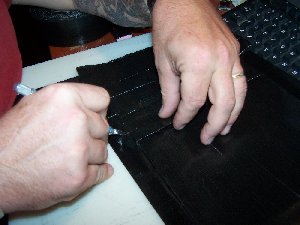 |
| 18. | Place a piece of tape on the bottom halfway on and halfway off. Fold it over to reinforce the bottom, and trim it off with your knife, but DON’T CUT THE BAGGIE! Now all that’s left is the flap. Line up one edge of your new pouch with the edge of the cutting board. Using the board to measure (not the pouch) measure over 1 inch as shown by where the knife is and cut a diagonal piece out of the flap from the bag opening to the end of the flap. | 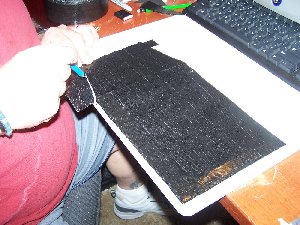 |
| 19. | Then turn the pouch over and do the same thing on the other side. | 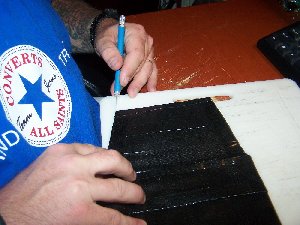 |
| 20. | If you remember the way you trimmed out the bottom by adding a piece of duct tape and folding it over, then trimming it with your knife, that is what you are going to do here on the diagonal sides of the flap. Finally take the other 7inch strip from earlier and trim out the very top, or the end of the flap with it, fold it over and trim off the edges. What you should end up with is something like this... | 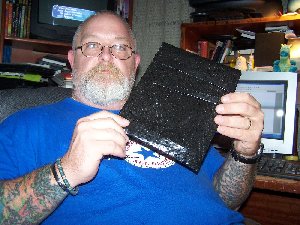 |
Safari Man has an additional method that does not require the use of a ZipLock bag, and those directions can be found in this photo album.