Help: Tools of the Trade
- Where do I find the supplies I need to begin letterboxing?
- My markers aren't working well! Are they garbage?
- Why do some people use markers instead of ink pads?
- Why are my markers not stamping very well?
- My light colored markers are dirty and ruined. What did I do wrong?
- How do I remove labels from beer bottles?
- How can I clean old ink off of stamps?
- Where can I find tiny pens to include in letterboxes?
- How do I make a letter book?
- How many pages can I cram in a logbook made with my Bind-It-All?
- How do I prepare a padded envelope for sending a postals or LTC?
- What are the parts on a Bind-It-All called?
- Letterboxing 101 class outline
- Letterboxing 101 outline answers & tips
- Letterboxing 101 Logistics
- Letterboxing 101 in school sample clues
- Letterboxing 101 Take Home Handout
- Letterboxing 201 handout
- Letterboxing 101 Exchange DIY instructions
- What color ink should I use when inking up a found stamp?
- Where can I find help with a clue in code?
Where do I find the supplies I need to begin letterboxing?
There are a number of sources, but you might start at Atlas Quest and the Marketplace toolbar. Stampeaz sells PZKut as well as other carving materials, including beginner's kits. They also carry carving tools, blades, and stamp mounting foam.
If you are watching your pennies, don't forget to look for the 40%-off coupons in your Sunday paper advertisements. Hobby Lobby runs online coupons you can print out.
Don't forget to look in specialty art supplies stores and in the fine art department of campus bookstores. Dollar stores and clearance aisles or bins will yield some great finds. Ebay is a great source of inkpads at reasonable prices.
- Carving material: PZ Kut, MasterCarve, Speedy Carve is available at Stampeaz, the "Pink Stuff" by Speedball and other supplies are also available at Dixie Graphix and then there is Nasco Safety-Kut, try the dollar store for white erasers, magic rub erasers and pink pearl erasers, which also work well.
- Carving tools and medium, logbooks, inkpads and markers can be found at Hobby Lobby, Michaels, and A.C. Moore.
- The most popular containers are probably Lock & Locks. They can be found in some department stores such as Meijer in the Midwest, at Target, Walmart and Albertson's or ordered online through Dixie Graphix operated by Dixie a letterboxer here at AQ or at Heritage Mint. Dougerware can be found at dollar stores.
- Camotape can be found at Walmart, Meijer, Gander Mountain, Bass Outlet, Canadian Tire (paint aisle) and L.L. Bean.
If you are watching your pennies, don't forget to look for the 40%-off coupons in your Sunday paper advertisements. Hobby Lobby runs online coupons you can print out.
Don't forget to look in specialty art supplies stores and in the fine art department of campus bookstores. Dollar stores and clearance aisles or bins will yield some great finds. Ebay is a great source of inkpads at reasonable prices.
My markers aren't working well! Are they garbage?
When you have a set of markers and they start drying out on you, it can be frustrating to spend the money on a new set. Luckily, The Yorkshire Tortoise and ArtGekko have shared their techinques for bringing markers back to life, whether they are cheap markers or exspensive markers.
Revitalizing Markers:
ArtGekko adds...
"I have had the same set of markers for 15+ years. I'll spend m oney on other things, but for some reason it really bothers me to throw markers away. Go figure.
When they dry out, I pull the rear cap off, tap out the plastic-encased felt ink reservoir, and hold the end that goes around the writing nib under a barely-running faucet for 1 or 2 seconds. Put it all back together and they work great for another year or two.
It generally only works on the markers that have a solid-colored barrel and a white rear cap. I have never been able to get the rear caps off Crayola markers.
Just an idea that works for me."
-AG
and YT adds...
"My favourite markers are the ones I bought in the 1980's. No idea what make they are and am unable to find anything like them now. I could kick myself because I threw one away that had dried up before I discovered you could wet them again :-(
You can't get the ends off, but what I did with mine was put the tip in a drop or two of water for about a minute. Then I put the cap on and stood it on it's end - the opposite end to the tip - for about 5 mins and next I stood it on it's tip end for the rest of the day.
Worked like a charm and I revitalised at least half of them that way. One had totally dried up which is why I am so cross about the one I threw away."
YT
Why do some people use markers instead of ink pads?
Colors. Lots and lots of colors. Markers are a relatively cheap method of buying lots of colors that fit into a relatively small amount of space—an important consideration for many letterboxers. Besides turning your logbook into a visual delight, many rubber stamps are designed to use a specific color or colors for the best effect. Ink pads are more expensive and large enough to discourage many letterboxers from carrying a full set of colors.
Resources:
The Art of Stamping
Resources:
The Art of Stamping
Why are my markers not stamping very well?
A stamp that requires an intricate coloring job could take several minutes to color in properly, and by the time you finish, the first colors you applied may have already dried. Remedy the situation with a process known as huffing. Hold your hands together with your palms up, place the colored stamp in your palms, and bring it to your mouth. In the same way you would breathe on your hands to warm them if they were cold, huff on the stamp. This helps add the missing moisture to the ink on the stamp. Be careful not to over-huff the stamp. If you add too much moisture, the ink will bead up and also cause a poor quality image.
My light colored markers are dirty and ruined. What did I do wrong?
When using markers you need to follow a certain order when coloring your stamp. Start off by coloring with the lightest color marker (yellow) and gradually progress upwards to the darker colors (black). If you try doing it in any other way you run the risk of hitting the dark ink with your light colored marker. This will get the dark ink onto the felt of the light marker. This could potentionally ruin your markers. If you catch your mistake soon enough after dirtying you light marker you can try "twirling" the felt tip on a paper towel to clean it off. This will sometimes pull out the dark colored ink.
Additionally, heavily used stamps where previous people used dark colors will often cause the previous color to leach out into your markers or ink pads. Be sure if you are using light colors that the color matches what was previously used on the stamp or make sure the stamp is cleaned thoroughly before using your markers on it.
Additionally, heavily used stamps where previous people used dark colors will often cause the previous color to leach out into your markers or ink pads. Be sure if you are using light colors that the color matches what was previously used on the stamp or make sure the stamp is cleaned thoroughly before using your markers on it.
How do I remove labels from beer bottles?
This has been sort of outside the realm of letterboxing until recently. Beer label art is a unique treasure that has appeared in several letterboxes. The launch of the 99 Bottles series has brought it to the forefront, spawning a PLB ring and a few additional boxes. Several people have wanted to do a particular beer. They've got the bottle, the label... but how do you get it OFF?
In case you run across one that's a must-have, here's how to get most labels off:
Get the biggest microwaveable cup available (such as a 20 oz plastic food service cup like you might find in Pizza Hut). Fill that with water and nuke it for 2 minutes to get it hot hot hot. Pour enough into the bottle to compensate for its buoyancy (usually about half full), then lower the bottle into the cup of hot water. Give it a minute or so to loosen the glue, then gently test the label's adhesion.
Some labels come right off. Sometimes you have to wait a few minutes. Sometimes you'll need to peel back a little, soak a little longer, peel back a little more, soak a little longer... and repeat as necessary.
NOTE: sometimes the inks on the label, particularly dark, rich colors, will leach out of the paper, making the label useless for scanning.
Once the label is off, place it in a folded paper towel, pat it to remove the surface water, remove it from the paper towel (lest the glue adhere to the PT), then lay it out face-down to dry. Usually the labels will wrinkle as the water evaporates, but they can be smoothed out once they're totally dry. If you'd like to send your label for consideration in the 99 Bottles Epic Series, contact StarSAELS off-list to make arrangements!
How can I clean old ink off of stamps?
Do not use anything with a scent, like baby wipes, on letterboxes planted in the wild - that can attract animals. Also, some of them contain alcohol which may be damaging to the carving medium. There are commercial stamp cleaners that work very well. But if you don't want to carry a bottle of cleaner, damp paper towels in a plastic baggie works just fine. They are very lightweight and compact to carry. One paper towel per small ziplock bag is recommended because once a towel becomes dirty, it tends to bleed the ink into the other clean towels in the same bag. Please remember to pack the towels out with you and dispose of them properly.
Where can I find tiny pens to include in letterboxes?
You generally don't need to include a pen in a letterbox at all; finders should bring a pen with them. You might want to include one for some special reason, though, such as providing a special color or making it available for coloring in small areas of the stamp image. (A red ballpoint works great to add bright red accents to a black-and-white stamp image!) In such cases, it's usually easier to make a tiny pen than to find one! Check the [Prime Suspect Mini Pens Tutorial] for details.
You can shorten pens perhaps an inch with less effort; basically just cut them off, leaving them just long enough for the ink tube within.
You can shorten pens perhaps an inch with less effort; basically just cut them off, leaving them just long enough for the ink tube within.
How do I make a letter book?
It's very easy. Once you've selected the book you'd like to use, make a thin solution of glue and water. Apply the solution in between and arround the pages you'd like to be the walls of the "box". Don't forget to separate the glued pages from the dry ones with something like a plastic bag while the glue dries.
Once the glue is dry, mark the perimeter of your future "box" with a pencil. All that has to be done now is for the section of the pages that you marked to be cut out.
This video shows the process of making a secret compartment book.
Once the glue is dry, mark the perimeter of your future "box" with a pencil. All that has to be done now is for the section of the pages that you marked to be cut out.
This video shows the process of making a secret compartment book.
How many pages can I cram in a logbook made with my Bind-It-All?
It depends on what wire size you are using and the weight of the paper in the cover and pages. The table below has some basic guidelines. If you are using heavier stock for covers, remember to subtract some pages to accommodate the cover.
| Wire Size | Paper Type/Weight | Cover Material | Approximate Max Page Count |
| 3/8" | index cards | mat board | 10 |
| 3/8" | 20lb (standard copy paper) | 20 | |
| 1/2" | 60 weight paper | plastic gift/credit cards | 40 |
| 1/2" | index cards | mat board | 40 |
| 1/2" | index cards | fancy paper w/cereal box backing | 50 |
| 1/2" | 20lb (standard copy paper) | 100 | |
| 3/4" | index cards | 50-70 | |
| 3/4" | 20lb (standard copy paper) | 100-140 | |
| 1 1/4" | index cards | 110 | |
| 1 1/4" | 20lb (standard copy paper) | 220 |
How do I prepare a padded envelope for sending a postals or LTC?
Here's the best way to make sure your postal or LTC envelope survives...
If it's a paper covered padded envelope...
Put return address stickers (yours) in the return slot, and in the mail-to slot. Cover the entire envelope with one layer of clear packing tape. The paper can and will rip in transit, unless protected by plastic of some sort. The tape does a good job. Put an extra layer across the mail-to place and the postage place so that when it comes home, you can take that layer off and have a pristine envelope again. Put a piece of tape across the "peel here to expose adhesive" strip. Sometimes I even remove that strip and then put the tape across it to prevent temptation and accidents.
If it's a plastic covered padded envelope...
Put return address stickers (yours) in the return slot, and in the mail-to slot. cover the entire front of the envelope with one layer of clear packing tape. The plastic does a good job of protecting the envelope during transit, but often tears when tape is removed. Put an extra layer across the mail-to place and the postage place so that when it comes home, you can take that layer off and have a pristine envelope again. Put a base layer of tape on the back of the envelope where people are going to tape it shut, to protect the plastic from tearing. Put a piece of tape across the "peel here to expose adhesive" strip. You can even remove that strip and then put the tape across it to prevent temptation and accidents.
When you address it for the first time...
Please note that it is a lot easier to remove paper address labels rather than sticker ones. If you use stickers, put an extra piece of tape UNDER the mailing label with one corner folded under, so the label can be easily removed from the envelope. If you use paper labels, put a piece of tape OVER the mailing label with one corner folded under for easy removal.
When you re-address a postal to send it on to the next person...
Try to remove as many labels as possible, as this makes the package lighter and may save you postage. Please note that it is a lot easier to remove paper address labels rather than sticker ones. If you use stickers, put an extra piece of tape UNDER the mailing label with one corner folded under, so the label can be easily removed from the envelope. If you use paper labels, put a piece of tape OVER the mailing label with one corner folded under for easy removal. Make sure your label is large enough to cover any labels you couldn't remove.
How to package contents if it's a postal...
Put your logbook in a zip-lock baggie. Wrap your stamp in felt or a paper towel and it in a separate baggie, for ink control. not everyone cleans stamps. Put both zip-locks in one outer baggie to keep everything together. Put the outer baggie into the envelope and tape the thing shut. Then mail it.
How to package contents if it's LTCs for a swap...
Put all the LTCs in a baggie, and put the return postage in the baggie with them, so it's easier for the swap owner to find everything and not miss something hiding in the bottom of the envelope.
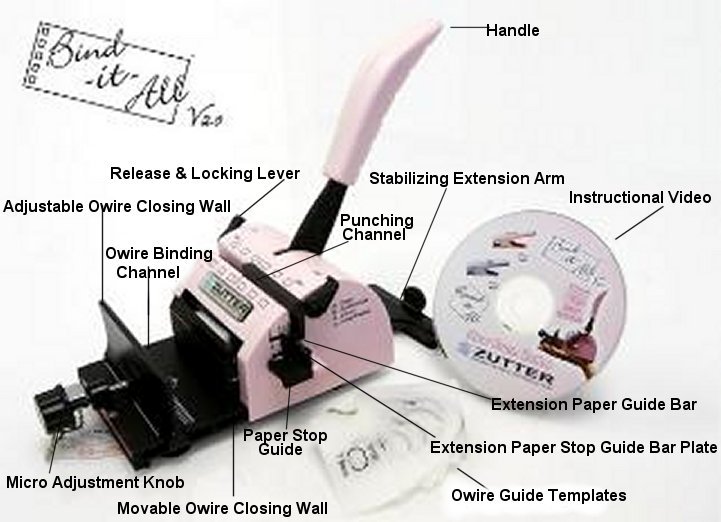
What are the parts on a Bind-It-All called?
Letterboxing 101 class outline
The following outline was developed by MO UR4Me. Edit it according to the amount of time you have and the ages of your participants. If you want to give them a handout, replace the capitalized words with _______. However, most participants are usually paying attention pretty well and don't need to record the answers.
Details on HOW to teach each item is in a separate Wiki entry, "Letterboxing 101 class tips"
Letterboxing 101
LETTERBOXING IS...
1. A letterbox is a HIDDEN container somewhere in a public place. It is often in a scenic area or a place with historical significance. It's good way to see new places and even make new friends! And it's cheap entertainment!
2. A letterbox contains a RUBBER STAMP and a LOGBOOK.
3. Letterboxers use a TRAILNAME.
4. CLUES are found at www.AtlasQuest.com (AQ) or www.letterboxing.org (LBNA).
FINDING LETTERBOXES
5. Check to see if it has been FOUND recently. On AQ click "Show Finds"; on LBNA log in and click green flag.
6. READ the clues first.
7. When you go hunt for a letterbox, you need to bring your:
a) clues d) personal logbook g) compass
b) signature stamp e) pen h) paper towel
c) ink pad or markers f) hiking gear: water bottle, bug spray, snack, cell phone, first aid kit, etc.
8. A "pace" equals TWO STEPS .
=========================
RULES ("Code of Conduct")
SAFETY -- poison ivy, snakes, spiders, using sticks, partner, cell phone
STEALTH -- move away, pretend to take a photo, tie your shoe, have a snack, use phone
RESPECT -- for nature: leave the area better than you found it: DONT disturb nature by: littering, leaving a trail to the box, breaking the sod, removing native vegetation, disturbing natural rock formations, taking apart rock walls or interfering with animals or their habitats.
for people: reseal and rehide well, replacing it exactly as you found it, report your find.
=========================
9. Only one person from your group should LEAVE THE TRAIL .
10. Don't let any MUGGLES see you!
11. When you find the letterbox, you stamp:
a) YOUR stamp in the BOX's logbook, with your trailname, the date & where you're from.
Try not to use up an entire page, please!
b) the LETTERBOX stamp in YOUR logbook, with the date found and the planter's trailname
12. Don't clean off a stamp with a BABY WIPE ; it can ruin the stamp over time.
13. You might find a HITCHHIKER ! (Don't take it unless you can move it on.)
14. Check for bonus clues in THE BACK OF THE BOOK.
15. Make sure to REHIDE it very well, just like you found it.
16. Please LOG your find; this helps planter know it's OK and future finders to know it's still there!
Letterboxing 101 outline answers & tips
Letterboxing 101 Outline Answers & Teaching Tips
1. HIDDEN
Explain that I will teach them about a "treasure hunting game" called letterboxing. There are at least 60,000 of them hidden in the US and around the world! And there happen to be ____ of them in this park/location. Later, you'll get to find one! If there is time, explain a brief history about how it got started.
2. STAMP, LOGBOOK
Show a sample box, stamp & logbook. Explain the significance of hand-carved stamps and tell a story about a neat one that you have found. Show your logbook and how now you have a collection of memories from all the places you have been.
Give the agenda (learn about letterboxing here, make a stamp, then go in groups to find a letterbox.)
3. TRAILNAME - comment on what a weird name someone has in a sample logbook and then talk about trailnames and get them to start thinking of their own.
4. CLUES - I have a printout from both sites mounted as a poster that they can view later to see the difference between the two sites, as well as how many are in the area.
5. FOUND Explain how to check the last finds on both AQ and LBNA and why.
6. READ
Some clues require other supplies or that you solve a code or puzzle first.
7. Explain what supplies you are giving them today (i.e what they will use as a logbook). I give them 4x6 index cards and tell them they can put it in a photo album later.
8. TWO STEPS
Ask them what they think a pace means. When they get it wrong, demonstrate. Demonstrate clock directions and how to use a compass, if applicable.
Stop here and ask "Every game has rules, right? Well this one does, too."
RULES ("Code of Conduct")
STEALTH -- move away, pretend to take a photo, tie your shoe, have a snack, use phone
SAFETY -- poison ivy, snakes, spiders, using sticks, partner, cell phone
RESPECT-- for nature: leave the area better than you found it:
for people: take good care of the stamp, reseal and rehide well (not upside down!)
9. LEAVE THE TRAIL If everyone does, you have just made a new trail.
10. MUGGLES
Ask if there are any Harry Potter fans out there. What are the people called who don't know about Harry's secret world? Remember to keep this a secret!
11. Explain and demo the stamping in process. Most don't "get it" until you show them.
Stress that they should not take up an entire page in the logbook with their stamp!!
I enlarged an image from a logbook and showed them what it would look like - trailname, stamp, date, where from.
12. BABY WIPE (depends on audience)
13. HITCHHIKER (depends on audience)
I only explain this if necessary; mostly because I don't want them to find one and remove it.
14. BACK OF THE BOOK - explain bonus boxes and where you might find clues to them.
15. REHIDE well, just like you found it. Not upside down!! Make sure lid is on and baggies are not caught in it.
16. LOG (depends on audience)
TEACHING STAMP CARVING
Ask them to watch the entire process first. Once they get into their supplies, they don't listen to you anymore!
For my sample, I made a giant B (actually two of them in various stages of the process) so they would see it backward on the stamp.
Draw around your eraser/rubber on a paper (I use index cards or paper scraps) so that you have a rectangle no larger than your stamp.
Draw a SIMPLE design inside the box. Lines must be THICK and DARK. Emphasize this unless your carvers are older and will be using sharp tools. If you are using pencil tops to carve, show examples of a good drawing and a bad drawing. Budding artists will just have to hold themselves back!
Demonstrate how to hold paper on eraser and rub image to transfer. Emphasize that they need to hold the paper still while doing this! Otherwise, many smear it and want a new eraser. Note that the B is now backward.
If applicable, show them how to remove the eraser from a pencil. Have extras ready for when they rip the eraser off. Show them how to squish the end, but not all the way!
Show how to SCOOP away from you with the tool, not scratch toward you. If you are using cuticle trimmers, make it clear that they do NOT have to dig deep into the rubber; just use the bottom part of the V.
Show how to color it with a marker (if applicable) and stamp it. Note that the B is now forward again.
Then let them try it!
Be prepared to clean up all the carving mess afterward.
Letterboxing 101 Logistics
The logistics of a letterboxing class can be tricky, depending on the number and ages of participants.
If you are teaching families at a park, they can all go off on their own later to find the letterboxes.
If you are teaching a class of elementary students, however, extra legwork is needed to let everyone have a part in the finding. Here are some suggestions:
1) HIDING - Have letterboxes for them to find in multiple directions from your starting location. Try to let them find at least 3. If you have a lot of boxes/people, you can have various routes, for instance, four loops with 3 boxes each.
2) QUANTITY - It's best to have enough letterboxes for them to have only 4-8 people per group. The fewer the better.
3) CLUE WRITING - If you will have large groups of kids, make enough steps in your clues that they can take turns "leading" each step. You may have to get creative in adding extra steps to make it work, i.e., "make a 180 degree turn and walk forward 3 paces". You can either number the clues and pass the sheet from person to person, or cut them apart and give each child one step to hold, then call on them to lead when it's their "turn".
4) OTHER LEADERS - If you have other helpers, make a separate sheet of [decoded] instructions for the leaders to read over ahead of time.
5) INK - Unless you are using black for everything, put an ink pad in the letterbox for them to use for that stamp. Have each participant take one marker along for inking their signature stamp.
6) SUPPLIES - Have all supplies they will need prepackaged in Ziploc baggies (carving supplies, logbook supplies, pencil, etc.) Don't let them touch the supplies until you are ready! Have permanent markers for them to write names on baggies. Make sure there is something the students can use as a hard surface when they are stamping on the trail.
7) TIMING - If groups are taking turns finding the boxes (if you have more groups than letterboxes), let others exchange stamps in the meantime. You may be busy swapping clues and supplies, so it works best if you can make this self-directed. You can put 4x6 index cards with instructions in a paper bag and just tell them to do what's in the bag. Have a display of stuff they can look at if they have extra time. Some will take longer making stamps than others.
Letterboxing 101 in school sample clues
Sample clues for teaching a group of 40 students, grades 2-5 (10 of each). Shown is just one set (three boxes) for one of the groups.
Box Step Clue
Ice Cream Social 1 Outside Ms. Painter's door, turn left and walk until you get to a shiny red heart on the right.
Ice Cream Social 2 Continue going straight and go down some stairs.
Ice Cream Social 3 Continue straight until you are near the fire extinguisher.
Ice Cream Social 4 Turn right, then follow the hallway and turn left again.
Ice Cream Social 5 Go down the hallway and down one set of stairs.
Ice Cream Social 6 Go straight and down one set of stairs.
Ice Cream Social 7 Turn 180 degrees and go down the stairs.
Ice Cream Social 8 Follow the blue stripe along the left side of the floor to the doors.
Ice Cream Social 9 Enter and stop under the hearts.
Ice Cream Social 10 Find the reference section and go there.
Ice Cream Social 11 Find the bookshelf unit with the World Book encyclopedias.
Ice Cream Social 12 Look on top of the shelf, behind a book about a large building.
I Spy 1 Go to the doors of the library.
I Spy 2 Turn left and walk all the way to the yellow bulletin board ahead.
I Spy 3 Turn left and go down the stairs.
I Spy 4 Turn right and walk under 3 red exit signs.
I Spy 5 Turn 180 degrees and walk 3 paces forward.
I Spy 6 Turn north and walk 6 paces.
I Spy 7 Enter the blue door on the right and be on your best behavior.
I Spy 8 Pass 4 soft blue items on the right.
I Spy 9 Look near the exit ahead for a picture of scissors.
I Spy 10 Look carefully under the scissors, behind a display.
Bowser 1 Go to the library.
Bowser 2 Turn south and then go up one set of stairs.
Bowser 3 Turn right and go up one set of stairs.
Bowser 4 Go straight, up stairs, then right, then straight, then left.
Bowser 5 Walk straight until there is a shiny red heart on your right.
Bowser 6 Turn 90 degrees to your left and walk to the end of that hallway.
Bowser 7 Turn 90 degrees to your right and walk 7 paces.
Bowser 8 Enter the door of the classroom on your left.
Bowser 9 From one of the tables, cut an isoceles triangle (2 sides equal).
Bowser 10 Throw away your scraps and be very thoughtful as you do so.
Letterboxing 101 Take Home Handout
If teaching a group of kids, it's nice to send home information to their parents. The following is a sample of what could go on a 1/4 sheet of paper, with your sig stamp at the bottom. On the back you can list what letterboxes were part of your class if you want them to be able to log them online.
I WENT LETTERBOXING TODAY
Letterboxing is a kind of treasure hunt game. There are clues on the Internet to hidden containers called letterboxes in public places like parks and libraries.
The "treasure" is a hand-carved (usually) rubber stamp that you stamp into a book (called your logbook) as a memory. You also carry your own rubber stamp and stamp a logbook that's inside the letterbox to show others that you found it.
Letterboxes are all over the place! There are over 1000 letterboxes in Missouri and around 200,000 in the U.S.! You get the clues from one of two websites:
www.AtlasQuest.com or www.letterboxing.org
In class, we used blank 4x6 index cards (from OfficeMax) which you can put into a photo album ($1 from Walmart!). We also carved our own signature stamps using erasers, but there are more complex carving supplies at craft stores and online.
AtlasQuest.com has tutorials for just about everything!
To try it out yourself, check out those websites first for more info.
Check: the previous finds before heading out, in case it's missing!
Bring: clues, rubber "signature" stamp, ink pad (markers work), pen, and a personal logbook of some kind (with unlined pages).
Be: stealthy, safe and have fun!
Log: your finds (or attempts) online afterward please!
BACK:
Letterboxes I May Have Found Today
Following is a list of letterboxes used for our class and who made them.
Use this list if you want to log your finds online and keep track of how many letterboxes you've found.
These are listed on www.AtlasQuest.com (many letterboxes are listed on both sites, but these are not). These were all planted by MO UR4Me but most stamps were carved by someone else.
Name of Letterbox Stamp carved by
It's Not What You Think MO UR4Me
LB101: Camp Sherwood MO UR4Me
LB101: Horton and Friends Red Paisley Quilter
LB101: Kimba The White Lion Webfoot
LB101: Bowser Mafia EverAfter83
LB101: Louie the Lightning Bug Okie Dog
LB101: Pot O' Green mudflingingfools
LB101: A Day @ The Beach mudflingingfools
LB101: A Tropical Surprise mudflingingfools
LB101: Ice Cream Social mudflingingfools
LB101: I Spy mudflingingfools
Letterboxing 201 handout
This is great handout to give to scout leaders when you teach a Letterboxing 101 class, since they may decide to plant a box as a troop/pack.
Letterboxing 201- PLANTING BOXES
To Plant or Not to Plant There, and How to Know the Difference
1. Letterboxes should be hidden on land to which the public has access. If placing on private property, get permission from the owner. Even some public lands require special permission. Check a list of local known regulations under Land Manage Policies here.
2. They should be placed so that a casual find by a non-letterboxer is unlikely.
3. Take all seasons and weather events into consideration, especially flooding.
4. NOT in national parks or monument areas (2010: up to the park's ranger).
5. NOT in dangerous areas.
6. NOT in places of worship.
7. NOT in environmentally sensitive areas with vegetation, flowers, or plants.
8. NOT buried in the earth, but rather placed under rocks, or in existing natural holes, crevices, or cavities.
9. NOT in a rock wall where finders may take apart the wall to find it.
10. NOT close to another letterbox (to avoid overly-intense use of an area).
11. It's also smart to check geocaching.com and make sure you're not to close to a cache!
Container Options
Be creative! You can use any container that will fit unseen in your hiding place, but make sure that it is WATERPROOF unless it is in a place that will always be dry. Also, some parks require CLEAR containers. The only used food containers that are pretty much water tight are the types with screw on lids, such as peanut butter jars. You can paint the box or cover it with camouflage tape (available at hunting supply stores) in order to make it less visible to "muggles". Some suggestions:
MEDIUM
Lock & Lock
old Thermos
Ziploc screw-on container
plastic peanut jug
hair styling gel containers
soy protein screw-on jar
Citrucel screw-on container
Ziploc/Duct Tape bag
SMALL
Lock & Lock
Ziplock screw-on container
Aveeno daily cleansing pads jar
jewelry cleaner jar
swim goggle containers
see www.sciplus.com
tub from Crayola air-dry clay? MICRO
Film canister
Pill bottles
Sucrets can (will rust)
Altoids cans (will rust)
tubes from the "Airborne" tablets
What NOT to use:
Glass containers, flimsy plastic containers, food storage containers that don't seal well such as Tupperware, Folger's coffee, margarine tubs. Unprotected plastic if the box will be in the exposed to the sun.
Get the food smell out !!
If the container previously held food or some other product, you need to get the smell completely out so that animals will not be attracted to your box and destroy it. Place clean cat litter in a large container that has a lid and place your container in it and seal the larger container. Take them out, and a week later, or so, no smell. Then run it through the dishwasher.
Letterbox Contents
* Logbook
* Stamp
* Pen
Optional:
* Official Letterbox label (recommended)
* First Finder certificate
* Ink pad or marker (if you want them to use a special color)
* Paper towel for wiping off the stamp
The items in your letterbox can be bagged in heavy "storage" or "freezer" quality ziplock bags for additional protection against the elements.
Sample Label text:
NOT trash - Please do not throw this away!!
NOT a Geocache - Please do not remove items or leave trinkets!
You have found an official LETTERBOX. Please rehide where found!
Stamp Carving basics (see AtlasQuest.com for tutorials)
A great hand carved stamp is a treasure and it's more personal than a store bought stamp.
Carving rubber stamps is a great hobby and form of expression!
Carving Your Stamp
1. Find a black & white image such as the rose shown.
2. Color the solid part of the picture with a #2 pencil.
3. Turn the picture over onto your carving medium and rub back of the picture with something smooth (like a spoon). This will transfer the reverse image to the eraser. NOTE: if you are using letters, don't just handwrite them onto your stamp or they will come out backward! Write them on your paper and then transfer them to the stamp with this method. The letters will be reversed on the stamp, but correct when you stamp with it.
4. Now, carve away the areas that will not be inked. It is always best to cut AWAY from the line at an angle so that you don't undercut the design. Start with the most difficult and intricate part of the stamp first in case you make a mistake. When following the curves of your image, it's easier to rotate the carving medium under the blade than it is to twist the carving blade around the stamp.
5. Test your stamp and make changes as needed. If your stamp is not taking ink well, you can "condition" it by rubbing acetone over the surface or coloring it with a Sharpie permanent marker.
6. If your carving medium is flimsy, glue a plastic bottle cap, small piece of wood, or piece of foam door-hanger to the un-inked side of the eraser to use as a handle. I use E6000 but you can get a variety of opinions on AtlasQuest.com.
7. Don't forget to keep an image of your stamp for yourself!
If you want to experiment with photocopied or laserjet images, place the copy face down on the rubber carving material and, using a cotton ball, wet the paper with acetone (nail polish remover) and then quickly lift.
Writing Great Clues
Most clues point you directly to the box while others involve creativity and work to solve. Clues can be entertaining, witty, funny, puzzling, historical, educational, intense, mysterious, cryptic, or straight forward. But a clue must be accurate! There is nothing more aggravating than a poorly written clue that is misleading. What is obvious to you may not be obvious to someone else. Build your clues by working backward to the starting point. It is also nice to give the seekers an idea of how far they will need to hike to find your box
-Create an interesting name for the box or series
-Use directions which are appropriate; right/left or compass coordinates or clock-directions
-Use landmarks and stationary objects of distinction.
-Using tree names is not recommended
-If you don't want to be straightforward, use a cryptic code, be poetic, make a puzzle/riddle or write clues that don't make sense unless you are actually there.
SUPPLY SOURCES
www.stampeaz.com -- carving and stamping supplies
www.dixiegraphix.com/shop/letterbox - containers, apparel, decals
shadohart.googlepages.com/home - fabric supply carriers
Hobby Lobby
Michael's Arts and Crafts
OTHER TYPES OF LETTERBOXES
A Hitchhiker (HH) has no home or clues of its own. It travels from one letterbox to another by the last person to find it. Some hitchhikers may have their own container or just a plastic bag. Hitchhikers should always be stamped in the box that they are visiting, in the finder's logbook, and in the letterbox that they have been relocated to with dates and locations to record the hitchhiker's activities. The idea is to keep the hitchhiker moving quickly.
Mystery Boxes are letterboxes with clues that are vague and unspecific as to the starting point or the general location. Mystery boxes often rely on landmarks or require knowledge or research of the area and history to determine where to begin the hunt.
A Cootie is passed secretly from person to person. Once you "catch a cootie" you stamp in the logbook with a stamp of your thumb and embellish the design. Sign your name and date before quickly passing the cootie box to the next unsuspecting person.
Virtual Letterboxes are online hunting adventures. Clues are found on the Internet and they lead to images that can be printed out and added to your logbook.
A Personal Traveler is a letterbox that stays with the person who made it. You will have to look online to find out what to do in order to get the stamp.
Letterboxing 101 Exchange DIY instructions
LEADER INSTRUCTIONS
1. Get some "Exchanges" from friends:
* Give each student a white 4x6 index card.
* Have them write their trailname at the top.
* Have everyone get out their signature stamp and a marker.
* Have each student pass his/her 4x6 card to the person on their right. That person should stamp his/her signature stamp on the card. Pass the card to the next person and get their stamp. Keep doing this until everyone has the other's stamps on their card.
What color ink should I use when inking up a found stamp?
It depends. The clues will sometimes tell you what colors the planter recommends. Many stamps are designed to work best in color. Multi-layered stamps require different colors, in order to distinguish the layers. The logbooks will often have an example of how the planter intended the stamp to be colored. Other stamps look good in a solid color, often black. Sometimes you can then color in the image later, just like you would a coloring book.
Although you can use a variety of ink, metallic inks are not recommended. They take a long time to dry, and will gum up the stamp. No matter what color you use, always clean the stamp with a spritz of water and a clean cloth after you stamp in. This leaves the stamp fresh and ready to use for the next finder.
Although you can use a variety of ink, metallic inks are not recommended. They take a long time to dry, and will gum up the stamp. No matter what color you use, always clean the stamp with a spritz of water and a clean cloth after you stamp in. This leaves the stamp fresh and ready to use for the next finder.
Where can I find help with a clue in code?
This site helps with many but not all codes: http://www.simonsingh.net/The_Black_Chamber/substitutioncrackingtool.html